Kitchen & Family Room - Before & After
*Edit February 2015*
I've recently learned this former house of mine is currently for sale on MLS and also has been popping up on some other Toronto websites with links back to my blog posts here, citing that this is still my house and that i still live there. Just to clarify - I no longer own or live in this house, I sold this house in December 2008. I want to also mention that because of my blog posts here about my house renovation, that two years after selling it the new owners, (he was fresh out of law school) filed a claim against myself and the Home Inspector for mis-representing the property (after an earlier failed attempt at trying to get money from each of the Broker firms ). After moving in to their very first home the young new lawyer and his new wife were not happy with the lack of sound privacy the row house offerred and claimed the real estate listing failed to disclose what the sound levels were. (??). To make a two year long small claims court story short,,,,,in a settlement hearing a Judge basically said they didn't have a chance, not a chance of winning any type of settlement in court over this, it wasn't a new build, it was a 100yr old+ row house and their expectations about what they were entitled to were completely unrealistic. Caveat emptor. It took two years of lawyers time to settle that.
*end of edit*
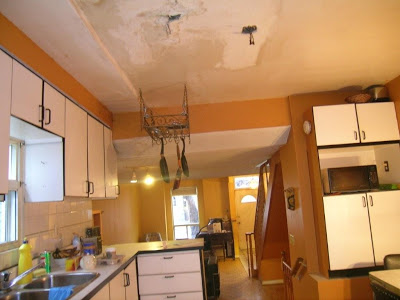
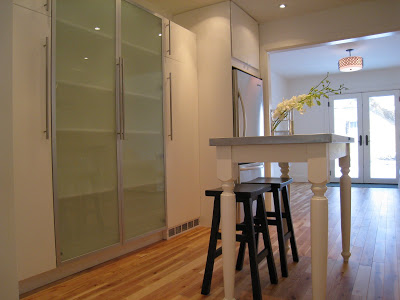
Below are some before pics showing the old 1980's kitchen. Half of the ceiling was badly damaged from a leak in the old roof, there was no dishwasher or exhaust fan and the cabinetry was rotted and falling apart. The first photo shows the extent of cabinetry, lowers and uppers along the window wall and a small cabinet over the bulkhead for the basement stairs. A table and chairs sat next to a freestanding fridge and in front of a long baseboard heater. We ripped it all out......including the window. In its place would be a new ceiling, new flooring, new window, new lighting, new appliances and new Ikea kitchen cabinets.
Before - View from Kitchen to DR and LR
Before - View from LR and DR to Kitchen and FR beyond.

It was definitely a challenge coming up with a layout for this kitchen. It was elevated from the Dining and Living rooms and also had an adjoining family room with a walkout to the deck and access to the garage. The kitchen spanned the width of the house so the main path of traffic flowed thru the kitchen, thru the family room and out to the only parking spot - in the garage. What I found most awkward about the kitchen was that the opposite walls were too far apart to make for an efficient work space but it was too narrow for an island or peninsula layout without removing the walls between the kitchen and Family Room - not an option for us. I wanted to utilize the long wall opposite the sink for full height cabinetry and add an island, even if it would be a small one. The walls between the kitchen and family room had to stay so I redesigned the layout within the existing footprint. One of the key elements was removing the baseboard heater and replacing it with a toe-kick heater that fits under the cabinetry on the one wall. This allowed us to utilized the entire wall for new full height cabinetry.
After - View of Pantry in kitchen looking thru to back door in Family Room. Toe kick heater under cabinetry.
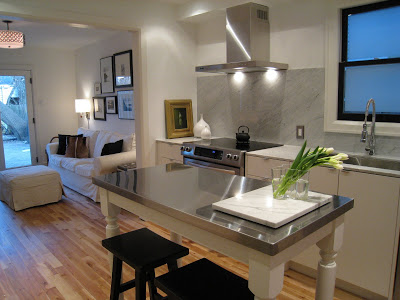
The view to the back of the house from the LR and DR was directly down the middle of the kitchen and at eye level (because of the elevated floor level) so I wanted an island that was more of a table style, something that was visually light and airy looking and moveable. Because I had limited time and even a more limited budget, I designed an island that we could make ourselves from stock goods - so the kitchen island became a DIY project. I purchased a ready made stainless steel top from Ikea (or you could use butcher block) some unfinished solid wood butcher block style legs from Lowes, and a bit of stock lumber. I planned out the apron size and blocking required and had the lumber store cut all the boards to the exact sizes I needed. Next I purchased all the fasteners and brought all the pieces home, ready to assemble. I supplied my 'other half' with the design drawing and instructions and within an hour he had put the entire thing together for me. To finish it off, all it needed was primer and 2 coats of finish paint. Super easy and quick!! The entire thing cost less than $300 and I absolutely LOVE the results. There are so many variations you could do by following the same simple steps. In an upcoming post I'll provide the design plan, the instructions and list of materials needed.


A new double hung window was installed, taller than the old window and I added a frosted vinyl film to block the unappealing view of the neighbour's house but still allows the light in. I opted for solid cararra marble counter and wrapped it up the wall 28" for a clean contemporary look. I had planned on adding a long wall mounted shelf with traditional corbel style brackets on the wall to the right of the window but since I had decided to sell the house, I left this open for the new owners to chose if they wanted to do this or not. To me this would be the perfect finishing touch - a great spot for displaying pretty bowls, plates and artwork but for those who like to cook, its great access to your dishes.

All of the cabinetry was from Ikea, and I chose the simple white Applad door style for a clean contemporary look. I customized it by adding full height thick gables between each of the cabinets, (which gives the cabinets more of a furniture look) and gave the entire kitchen a high end style by splurging on marble counters and backsplash, an oversized custom stainless sink, great appliances and a unique custom designed island. The slide in range reinforces the clean lines and the contemporary rectangular hood was a great find at Lowes for only $699.
The light fixture in the family room was by Jonathan Adler but I customized it to have a 6" drop, I loved the black metal detail on the shade and how it ties in to the other touches of black on the window frames and door hardware.
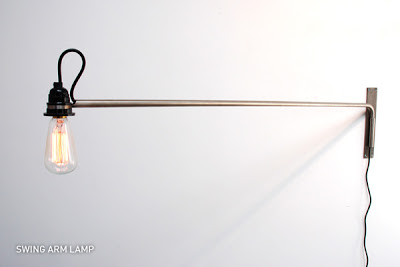
The family room was adjacent to the kitchen, with its walkout to the deck it was a really bright, sunfilled and comfy space with room for a sofa and two lounge chairs and a TV. I purchased an inexpensive but practical slipcovered sofa from Ikea, hung a small grouping of my own b&w photos, and brought an ottoman and 2 antique apple crates from home to furnish the space for resale. The pin-up lamps were a STEAL at only $19.99 ea from a building surplus warehouse, they have a fabric drum shade, a swing arm and 3 way dimmer switch. I've been back several times since to buy more and I'm sorry to say, they are completely sold out now! The new owners of the house purchased the sofa and the lamps too.
I'm proud to say that this entire kitchen, including all materials, appliances, labour (electrical, plumbing, drywall, cabinetry install, flooring install, fabrication) and all taxes came in at $17,700. The only work my handyman and I did ourselves in this part of the reno was the demolition, the painting, and hook-up of the kitchen faucet and dishwasher...and of course the design planning. All in all,,,,I think the quality and value of the end product is much greater than its modest budget and demonstrates that its not how much you spend,,its how you spend it!
Stay tuned for a future post with instructions for a DIY kitchen island.
For Parts 1 thru 5 of this Victorian Row House Reno:
All Photos: Carol Reed