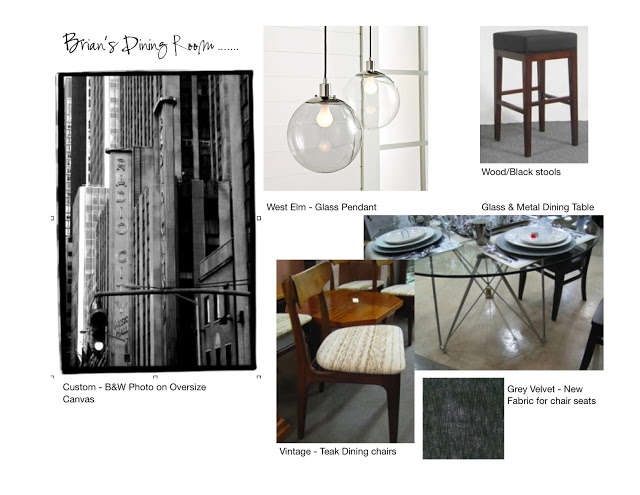
The design concept for the dining room was created earlier in December and all the items except for the light fixture were sourced and purchased before the holidays (record timing!). Its a small space which can't accommodate a lot of furniture so the the budget allocated for this area was tiny but yet I still wanted it to have big style. Now I have to admit the dining area is not a space that's of much importance to Brian, he's not intending to throw dinner parties or be doing a lot of entertaining, nonetheless, some sort of table and chair configuration would be practical for the occassional dinner guest or weekday meal. The fact that the LR and DR is one open space means that the dining table will have a perfect view of the large screen wall mounted tv in the LR - this feature seems to have heightened Brian's interest in the dining room design! Now that I had his interest, I suggested that the best value and style for the money would be to find some vintage chairs and mix them with a simple modern glass table, this is a great solution for both small spaces and small budgets but the best part is it adds some originality and authenticity to the room.
My biggest find was scoring a set of 4 danish modern dining chairs the Sunday before Christmas. The chairs had just arrived in the shop less than an hour before I stopped in and as soon as I laid eyes on them, I had to have them and they were bought on the spot (sorry to the guy who had been on a wait list for a year, but he was of the country for 3 weeks and I was there with cash in hand!). Two days earlier I had found an amazing deal on an interesting chrome and glass table that was just the size we needed and in-stock, so suddenly with this set of chairs now purchased the dining room was just about done and we didn't have to special order any of it - another great advantage to buying vintage pieces.
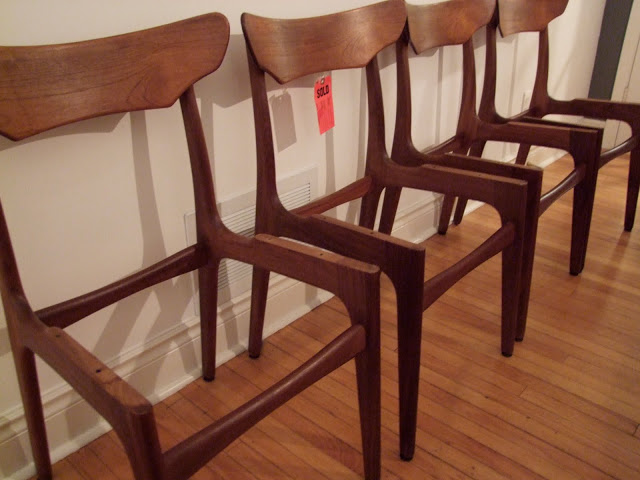
This past Thursday was a big delivery day at the condo project with several key pieces arriving. In addition to the mattress set, the sofa, the front hall bench, a credenza and the dining table,,,,,I also had to deliver the newly recovered vintage teak dining chairs....which was not so easy. I'm crazy for these chairs and I grew quite attached to them over the past couple of weeks, honestly I didn't want to give them up, it was like suffering thru a bit of separation anxiety!
The chairs were in absolutely perfect condition, the wood is beautiful and the lines of the chair are so organic and sculptural looking. For only $100 a chair, I don't think you can beat the quality and design. With some new fabric on the seats, they'd take on a new modern look. I picked out a charcoal coloured vevlet that I think is a beautiful compliment to the caramel wood tones.
An indication that the chairs were all made at the same time by the same mfg is the wood grain, on these chairs you can see the same knot in the wood, in the exact same place on each chair. This also speaks to the quality of the pieces.
Here you can see the continuous wood grain on all the chair backs and not a single exposed fastener or screw anywhere on the chair.
The underside of the chair had a muslin type backing on and when it was removed we found the original mfg's label.
I was thrilled to see the Schionning & Elgaard for Randers label. These chairs would have been made sometime between 1957 and 1960.
Thursday evening at Brian's condo,,,,,not quite ready for dinner.
As I mentioned above, quite a few furniture items were delivered on Thursday including the dining table. Unfortunately, I didn't hire delivery AND installation for the table thinking that it would be a fairly simple DIY project for the new homeowner!! So when Brian arrived we opened up the box and pulled out the instructions, anxious to whip this thing together and see the new table and chairs complete. Immediately we were both relieved to see that no tools were required, because he doesn't own any! A dozen fasteners and an allen key were all that was required so we sat down and attempted to piece it together..........every which way we could imagine,,,nothing worked, after 2 hours of frustration, we gave up. The instructions were useless, there were only 3 steps (ha!) but step 1 looked like a diagram of the solar system with no explanation. Trying to figure out the base configuration (which kind of resembles the eiffel tower) was like trying to figure out a rubic's cube. I started to understand why the table had been on sale and concluded at that point that even if it had been free,,,,,It wasn't worth the price. We agreed to call it quits for the day,,,,,but Brian vows to return on the weekend to try and figure it out. I hope he brings beer.

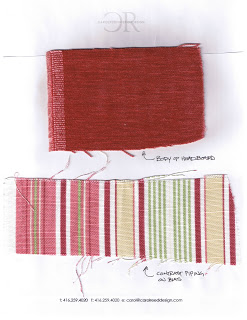
Test strip of digital print on canvas.
Since there's no room for a sideboard or console in the dining area I wanted to do something special on the wall to give the space some impact,,,so it wouldn't just be a table and 4 chairs in front of a blank wall. Original paintings or artwork of a substantial size is out of our budget range so I opted for original photography in this case. While its not cheap, it is less expensive than a large painted canvas and offers unlimited subject matter of your choice and can even be from your own photo collection. For this space I'm having a black & white image of a city scene enlarged and printed on a huge canvas, this will provide a great backdrop for both the dining and living area and create a modern urban vibe. A photographic scene like this at this scale adds a lot of depth and creates a great 'view'. I sent a photo to Kevin at
Elevator Digital and he's printing it on archival quality canvas and wrapping it around a stretcher frame. I stopped in yesterday to approve a test strip - it looks incredible, I can't WAIT to see this when its ready next week.

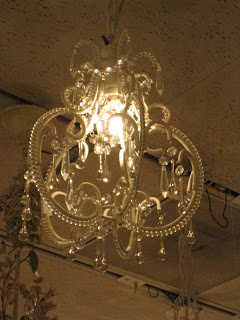
West Elm Globe Pendant
The last element of the dining room that remains outstanding is the light fixture. I LOVE this simple globe pendant from West Elm and think its perfect for Brian's place. Its not overwhelming and it has a bit of an industrial feel to it, especially when a filament style bulb is used - perfect for the modern vintage style we're after. Unfortunately, everyone else must love this fixture too because West Elm in Toronto is completely out of stock on these and they're on back-order until March. Uuugghh. Despite my sulking, pouting, and just plain old begging,,,,they wouldn't even sell me one of their 2 floor displays. So now I REALLY want this fixture but its going to require some creative resourcefulness. The West Elm on-line shopping site doesn't ship to canada, not even to the West Elm store here. I'm currently attempting to purchase it thru that site anyway as I have a US address I can have it shipped to, however,,,,,I'm getting stonewalled in the process. Even though I have a US ship to address, they can't process the order on-line unless you have a US billing address, in which case you have to call their 1-888 customer service no. to place the order. No problem I thought,,,,,this will all work out perfectly,,,,,,,until I tried calling the 1-888 number which doesn't work if you live outside of the US.??? The quest continues......
Stay tuned for posts on the front entry and bedroom design concepts and progress coming soon.
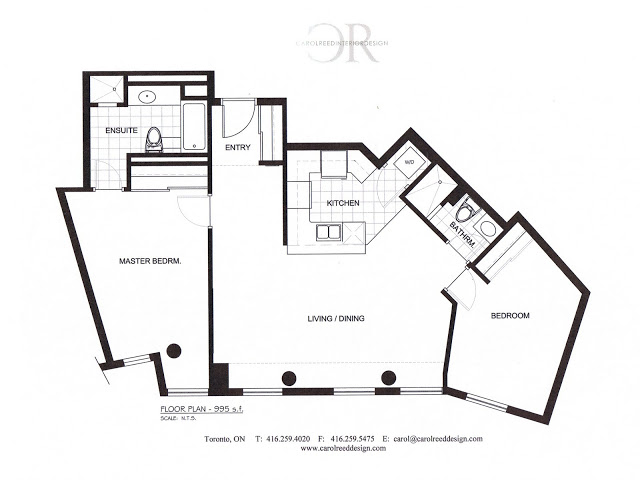
For the floor plan and first post on this Condo project go
here.
All Photos: Carol Reed