E-Design Bathroom: From Concept to Sneak Peek

CarolReedDesign-LM-Ensuite-EDesignConcept.jpg

E-Design Bathroom Concept

Lindsay contacted me through my e-design website

rearding their 3rd floor master suite, located in a century home in the beaches neighbourhood of Toronto, it was a large full floor bedroom with sitting area.  Her goal was to turn the sitting area into a new master ensuite.  The wish list included; double vanity, freestanding tub, walk-in glass enclosed shower, a separate water closet and….create space for a walk-in closet in the planning of the new ensuite.

Before Plan - Master Suite

The before plan was a wide open space divided by a staircase and there was a low sloping dormer ceiling in the soon to be new ensuite area.   The staircase had a half wall on one side and a frameless glass guard railing on the other.  Spaces with sloped ceilings are always a challenge for most people to visualize because the plan view is deceiving, there appears to be lots of floor space but in reality the useable floor space is much less. Wherever the sloped ceiling dips below 5or 6', its not considered *useable* floor space because there isn't standing room, its not completely useless space but its not useable for anything that requires standing up, like showering or using a sink or using a toilet.  In a bathroom with sloped ceilings the layout and placement of fixtures is largely dictated by these slopes - the plumbing fixtures all need to be located where there is full ceiling height or at least standing height clearance.  

The initial space plans quickly determined it wasn't feasible to fit everything in this space that Lindsay had hoped.  The top of the staircase landing is only 24" wide so accessing the ensuite from the landing side of the staircase was out of the question - this meant the only access for both the walk-in closet

and

ensuite would have to be on the far side of the stairs.  I 

could 

get everything including a walk-in closet in the floor plan but ultimately Lindsay decided she didn't want to walk-thru the closet to get to the bathroom.  So we'd need to give up either the walk-in closet or separate water closet....  

Layout option A reflects this compromise and came really close to ticking all the boxes.  The bathroom was spacious with the luxury of a separate tub centred in a dormer window and... a water closet.  While there is no walk-in closet the proposed wardrobes offered more space than the existing closets, but would require losing the long glass railing in order to fit a wardrobe wall.  I envisioned the wardrobes creating a beautiful wood veneer "wall"  backing onto the stairwell, stopping short of the ceiling to let light flow thru and also keeping the glass guard on the one end again to let light into the stairwell, possibly with mirror doors on the wardrobes too.  The glass guard rail though was not something Lindsay wanted to give up.  I would chose closet space or at least a half wall with drawer storage versus keeping a glass guard rail because storage is so very important and keeps your space/life organized.  However, I do understand how important it was for them to keep the glass, we moved on to explore more options and ended up at this final plan….

The ensuite was made a bit smaller to accommodate the closet location and thus the final plan doesn't have a water closet or walk-in closets but they were compromises Lindsay and her husband were happy with.  The closet space was great (deeper than the old closets) and the new ensuite was still spacious and bright with a large window, a new skylite,  interesting sloping ceiling and some built-in shelving. 

CarolReedDesign-LM-Ensuite-EDesignConcept.jpg

The concept board illustrates the fixture and finishes I recommended based on Lindsay's style survey and her desire for modern elements, white marble and rustic warm wood, in addition to these choices I also provided alternate options for each selection.  The vanity would be custom made and the inspiration photo is an example of the style and wood finish (character grade walnut planks). Here's an excerpt from her design summary of how I described the concept:

"

overall I took a contemporary approach using classic details and materials to create a timeless mix of modern and organic elements.

The high contrast of the ‘black’ metal finish with white also gives it an attractive graphic punch that feels modern and vintage at the same time."

"There is a great mix of materials; natural wood, natural stone, glass, and ceramic, as well an interesting mix of textures (both shiny and matte) and metals, paired with various levels of lighting all very thoughtfully applied to give the space great interest and depth. "

The tile options I provided worked with both her style preference and budget.  An elongated white subway tile on the walls, a white marble mosaic on the shower floor and a large format marble tile on the main floor as described in the written summary:

"...the large square in particular can give the effect of slabs especially if tight joints are maintained." 

As an alternate to the marble floor tile I also proposed a narrow rectangular black slate as I described in a written summary:

"This can be a very modern look paired with lots of white on the walls and natural wood, however, I do find that although its modern the dark on the floor is ‘heavy’ looking and a tad more rustic looking. 

To make it a little more elegant in feel, I’m suggesting a plank shape which you can lay in a herringbone pattern."

The concept for the cabinetry and built-ins, I proposed either a rustic walnut veneer that included the character of the knots, or a knotty european white oak. 

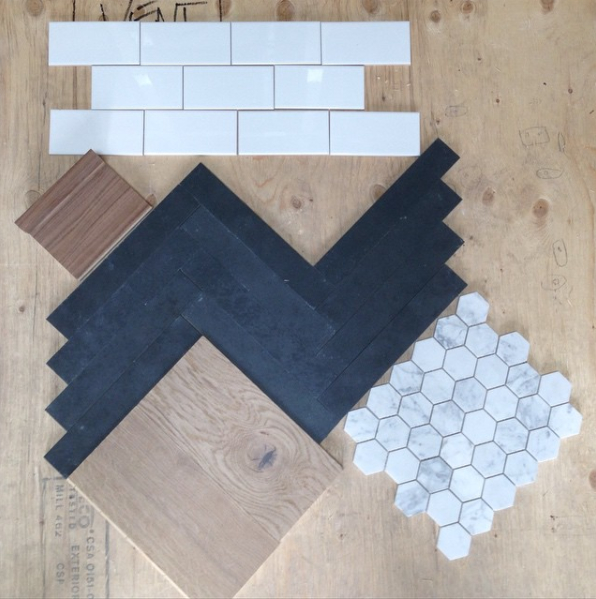
Here's the actual finishes that were chosen pictured here in an instagram photo, Lindsay ended up doing the europoean white oak for the flooring throughout the bedroom.  I believe the hexagon was intended for the shower floor (as per the design plans) but I think in the end it was either omitted or used only in the soap niche.  Can you tell how detail oriented and organized Lindsay is! I love that she has her materials mocked up so you can really see how the proportion of the tile sizes and patterns work with each other and how each material offers a different texture.

CarolReedDesign-LM-Ensuite-EDesign-Elevation A1.jpg

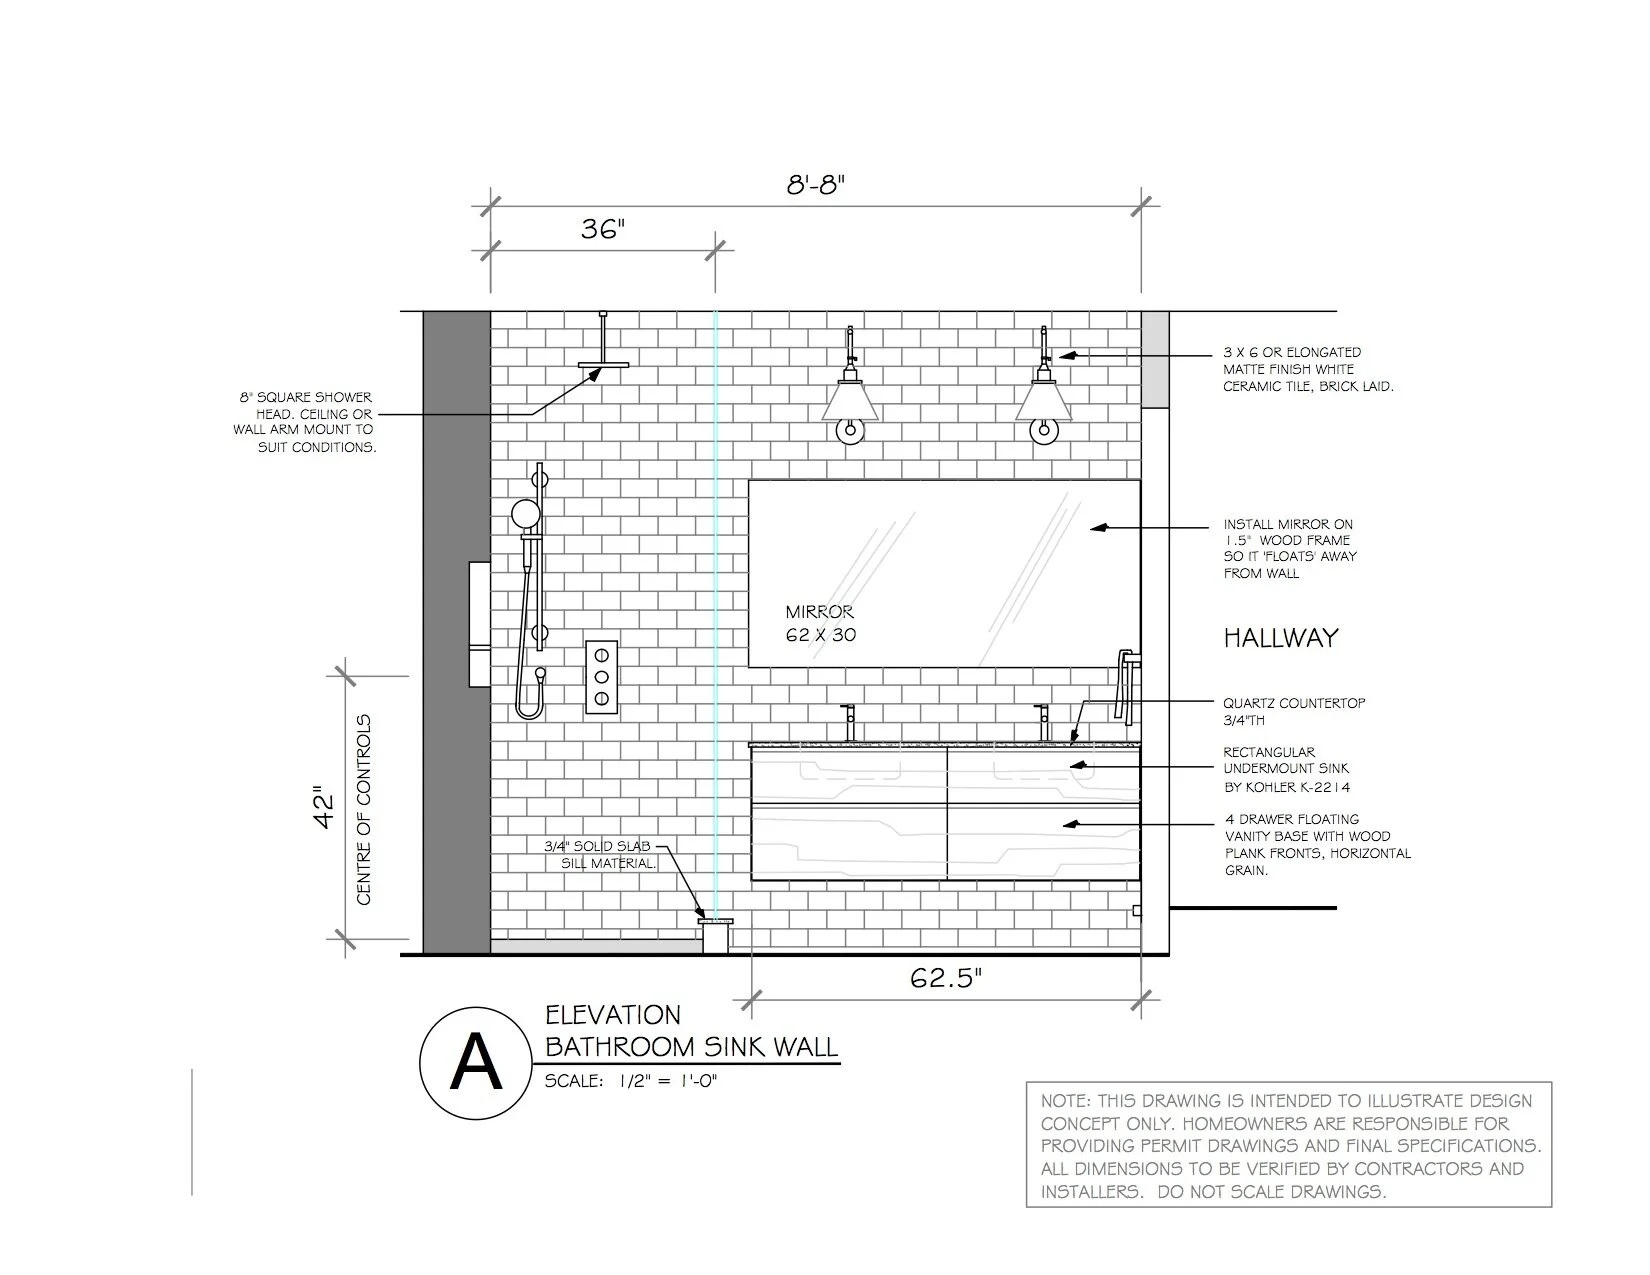
The floating walnut vanity would be custom made per the design elevations.  I provided a selection for a countertop mounted faucet or wall mounted (budget decision!), and a single long mirror would be floated off the wall, like so…..

"Have the float frame part of the mirror made from the same wood as the vanity or paint out in white to match the wall tile."

CarolReedDesign-LM-Ensuite-Progress-1.png

E-Design - In progress, custom floating walnut vanity.

I'm thrilled to see how this installation came together, and especially the decision to go with the wall mounted faucets, absolutely love it!

CarolReedDesign-LM-Ensuite-EDesign-Elevation B.jpg

This option of the shower wall showed the wall tile continuing across the entire wall behind the toilet with a recessed soap niche in the shower and recessed wood shelves under the eaves and a wood shelf ledge above the toilet.  I provided another option of this same elevation with the wall tile stopping just past the shower glass which is in fact the way it was installed.

CarolReedDesign-LM-Ensuite-EDesign-Progress-2jpg

E-Design - The After, view of shower wall

In this instagram image you can see a sneak peek of the finished space with a glimpse of the herringbone floor, recessed wall shelving beside the toilet and the floating walnut vanity. It looks like they opted to forgo a shower threshold which also means they continued the black slate tile into the shower.  My one concern with this decision is that the dark tile could really show soap residue on the surface and in the grout so hopefully that doesn't prove to be an annoyance.

The oval freestanding soaker tub takes prominence centred in front of the large dormer windows and tucked under the dormer roof.  A simple roller shade that operates bottom up will provide privacy and daylight.

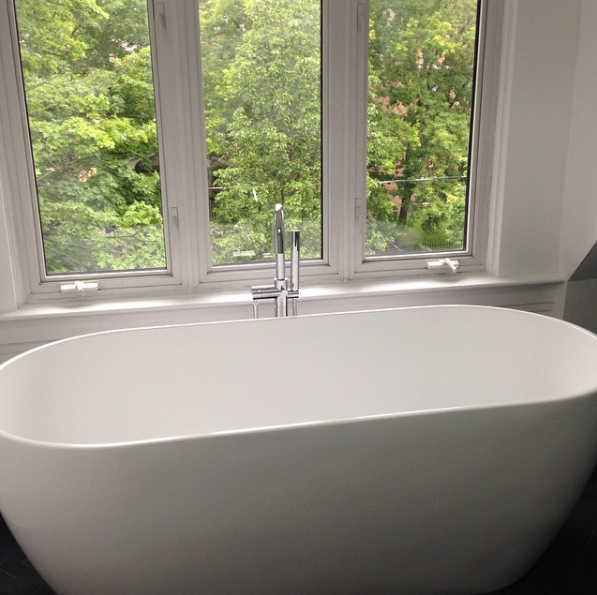
E-Design - After, soaker tub

I'm absolutely thrilled to see the progress of this bathroom renovation and how well the e-design plans were implemented.  With each e-design package there is always room (options) for clients to make decisions on their own and make personal choices and I love seeing which choices Lindsay ended up making and how beautifully its come together.

If you're interesting in E-design plans for your own bathroom or kitchen reno please visit my E-Design website

www.thedesignshop.ca

for details.  

All design drawings/plans:  Carol Reed Interior Design Inc.

Room and sample photos:  via Instagram

Labour Day 2015


Labour Day on the East Coast is bitter sweet because summer arrived really late here this year so it feels like we're celebrating the beginning and end of summer at the same time.   I've spent most of the summer at our house on the East Coast which explains my lack of blog posts recently - when I'm here, I focus hard on client projects during the weekdays so when the evenings and weekends roll around I can really disconnect from work and savour our time here, whether its just hanging out at the beach or getting some projects done around our own house.

Our house in Nova Scotia is located on the South Shore and is in a very small fishing community where most of our neighbours are multi-generation fisherman.   The lifestyle here is extremely laid back and very low key, there is nothing fancy or pretensious about the people, the homes or the businesses here.  I find it an extremely refreshing environment to focus on design work and I am always overwhelmed with inspiration from the ruggid scenery around me.   Yesterday we were so fortunate to be invited by neighbours to join them on an outing to their fish camp on a nearby island.  It was a day that was nothing short of idyllic in every sense from morning to dusk, it was the kind of day that epitomizes all the things I love about the East Coast and a day that not many non-locals would ever get the chance to experience.  

We boarded a neighbours lobster boat and headed out to a nearby island where another neighbour has a camp.  The weather was picture postcard perfect,,,crystal clear blue sky with not a single cloud visible the entire day, the sea was calm and the air was hot!  I'll let the pictures speak for themselves but you'll have to just imagine the scent of the salt air, the sounds and tastes of the day…. 


Our destination was an island that is home to a dozen or so fish shacks that the local fisherman use as camps for over night fishing trips and also for family getaways in the warm months where they enjoy swimming and cooking everything over an open fire.  Which is exactly how we spent the day…


Fishing camps.


Outhouse.


Our ride.


Collecting driftwood for the camp fire.


The salmon is strung up on old seasoned cedar planks and cooked by the open fire, we roasted scallops on sticks, and ate them like marshmallows while the salmon cooked.


Time to pack up for the boat ride back..


The view through a knot hole in the wood door on the fish shack in the above photo, no filter, this is literally the peep hole view through the hole in the door.


Captain.


The island in the background, the sun setting on one of those days you never want to end.

Happy Labour Day!


All Photos:  Iphone, by Carol Reed


My Top 10 Cottage Make-Over Tips

CarolReedDesign-Cottage-Makeover-Tips.jpg

From the West coast to the East Coast, I think most Canadian’s would agree the ultimate summer past-time is cottaging! That being true, one might say the second favourite past-time is searching for that ultimate summer cottage to call your own, but often the reality of what’s available or affordable can look more daunting than dreamy.   In honour of Canada Day I’ve compiled my top 10 favourite ways to update and transform a dated, dysfunctional drab cottage interior into your dream retreat, without the need to take a sledgehammer to it. Focus on quality materials from affordable sources for high style and function.

1. TAME THE WOOD:

Wood on wood on wood, furnished with more wood,,,is simply too much wood. Everything in wood just looks like a sea of brown (or orange).  If you love wood and want it to be a feature,,,,,then you must paint some of it out, this will in turn will highlight the natural unpainted wood so it can be appreciated for all its beauty, not drowned out.

2. CLEAN SWEEP:

Remove wall to wall vinyls and broadloom and replace with light to medium coloured character grade wood planks or natural stone slate tile (available in every imaginable size). These super affordable but high quality natural materials will be durable, forgiving, easy to clean and age well. When ultra low maintenance, budget, and practicality is the priority check out wood or stone look LVF (luxury vinyl flooring) or porcelain tiles that mimick stone or wood. Layer natural fibre area carpets and flat weave kilims for luxurious comfort and coziness.

3. UN-OBSTRUCT THE VIEWS:

Strip the windows of fussy ruffled fabric or boxy valances and heavy dark coloured blinds. Replace with fully retractable simple rollup blinds, shades or swing open shutters.  There are loads of inexpensive ready-made options that can even be cut to size in-store. My go-to’s are matchstick and bamboo blinds or cotton roman shades, mounted above the windows. Alternately or additionally use cotton or linen drapery panels on a dark metal or wood rod with rings that fully stack back to reveal the outdoors but can easily draw closed for privacy.

4.  COUNTER POINTS:

Many old cottages have plastic laminate, tile or plywood counters that are chipped and stained or dated in colour.  A new solid wood counter will add instant quality and substance. Custom made ones can vary greatly in price point depending on species, joinery and edge details but you can also find ready-made and easy to install solid wood countertop material at Ikea and most building supply stores. Perfectly suitable and charming for kitchens and bathrooms. Alternately a pre-formed laminate counter-top from the building centre, in white is a super inexpensive way to instantly freshen and brighten those surfaces.

5.  SINKS:

A simple sink swap out can add more function and style, replacing a small kitchen sink with a larger size will make clean up a breeze (or hide the mess til later), or swapping to a smaller size can net you more precious counter space.  Adding a second sink makes the kitchen doubly functional for two cooks or family gatherings.  In bathrooms, replacing a stained or retro coloured sink with a new vessel or drop in style is an affordable, easy install even onto an existing counter - no custom fabrication required!

6.  FAUCETS & HARDWARE:  

A new faucet and cabinet knobs are an instant style update to kitchens and bathrooms and interior doors.  Look for styles that will enhance your cottage character and evoke vintage, shaker, or rustic charm, in dark or aged metal finishes. Large gooseneck spouts, industrial pulldown sprays, classic bridge style or convenient single levers with high arc spouts. Splurge on fixtures made with solid brass cartridges and you won’t be replacing these anytime soon. 

7. APPLIANCES:

Replacing older mis-matched appliances is not only an aesthetic upgrade but the newer models are more multi-functional, energy efficient and space saving.

8. LIGHT IT UP:

Replace generic looking lighting with simple vintage or rustic style fixtures to enhance your cottage character and create a cohesive style.   Evoke rustic or coastal charm by selecting fixtures with aged or painted metals. (Black metal or oil rubbed bronze are my favourite!). You can add wall sconces, pendants and swing arm task lights without hiring an electrician - just use plug-in style fixtures that can be mounted to walls or suspended from ceilings wherever you need more light (which will be mostly everywhere!) and create ambience, all you need is an outlet nearby. Book shelfs, step lights, wall art, under kitchen cabinets,,,with LED lighting there is almost no where you can’t install lighting, even wirelessly.

9. SHELF IT:

Shelves are the easiest and most affordable solution for adding storage without the cost of built-ins. Install wall mounted shelving and brackets or ready to assemble shelves to not only organize but add purpose and function to any under utilized or cluttered area. Wanna amp up the style factor, use reclaimed wood, vintage metal brackets or wood corbels to create shelving that’s also a one-of-a-kind statement piece.

10. PAINT IT:

If you want a relaxing, calming, serene space that lets the outdoors be the main attraction,,,then paint over any loud, bold, intense hues on the walls in a light neutral palette that will compliment your view of the great outdoors and not detract from it. In small cottages, keep the walls and trim tone on tone for low contrast. Transform cabinetry with paint - an accent colour will highlight good quality wood kitchen and bathroom cabinets and make an instant style statement, or, simply neutralize lesser quality or unattractive cabinetry by painting them out.

11. PANEL IT:

I couldn’t stop at 10 without including my final and favourite way to add instant character and durability to walls and or ceilings - add panel moulding, v-groove, shiplap or beadboard panelling to walls, ceiling, islands, or backs of cabinets.  When painted with an enamel paint its also a great inexpensive alternative to tiling around bathroom or kitchen sinks and provides a sturdy backing for installing hooks and shelves (see tip no.9!). 

To see how I applied all of these strategies in this family cottage make-over check out the links below for individual before & afters:

Cottage Master Ensuite

Kitchen Progress

The Guest Bathroom Progress

The Guest Bathroom Before and After

The Boathouse Bathroom Before and After

The Boathouse Before and After

Photos By:  Carol Reed