Toronto

The Big World of Interior Design


A recent meeting at an office in downtown Toronto had me reminiscing about the earlier half of my career when I designed corporate interiors.  On this trip to Toronto I had the pleasure of attending a meeting in one of the most well designed spaces I've ever been in with stunning city views, perfectly appointed furnishings and impeccably planned details.  I could write volumes about the infinite design details that played out just in the lobby and boardrooms alone.


The commercial sector of the interior design industry employs the largest number of designers and makes up the highest volume of projects dollar wise and square footage wise encompassing hospitality, retail, personal services and business spaces. When you think about it, outside of your home almost every space you experience is designed by interior designers - from your corner starbucks to the movie theatre to the airport lounge, to shoe boutiques and all of those 9-5 office facilities both urban and sub-urban - large teams of interior designers and technicians design and plan these spaces.  In comparison, the residential sector of this industry is a tiny drop in the bucket yet it dominates the media and the public's perception of what interior design is.

For Interior Designers who have experienced working in commercial design you'll understand when I say that the residential market of interiors its an entirely different world, one that leaves us staring at HGTV with tilted heads and raised eyebrows wondering what the heck any of that has to do with interior design (!?), at least the world of interior design as we know it.


I've always felt that what we see happening in the commercial side of the design industry leads the way for what we'll see translating into residential spaces.  Fashion certainly has a large influence too but what we see in public environments makes a big impression on our aesthetics for our own homes.  Its common for clients to send me photos of things they've seen in hotels or restaurants that they want to incorporate at home.  Stainless steel appliances and countertops, back painted glass, floating shelves, recycling centres, giant screen monitors, halogen pendants, engineered flooring, green products.....all of these things were common place in commercial spaces a decade before they were mainstream for the home.  Same goes for mid-century modern furniture.  Fifteen years ago the only people you'd ever find with a barcelona chair in their living room would be an architect or designer, who've been using them in commercial spaces for half a century.  I remember just starting out in my career how much I idolized Barbara Barry but I only knew of her from the commercial spaces she had designed.  

I think my experience with commercial projects has been invaluable in understanding the technical side of built environments, in understanding the construction process and in learning how to work with contractors, trades and craftsmen.  For Interior Design students who may be graduating this year, I would suggest that even if your hope is to work on residential interiors that you don't completely disregard opportunities to work in other sectors and become as diversified as possible, if not soley for the chance to develop and hone your aptitude for details.


Some of my favorite things about working in commercial design and some of the most important things I learned are also many of the aspects I see lacking in the residential field so take advantage of work experience you can acquire elsewhere in the industry, the more diverse your design experience the better.  Either way if you are passionate about design then travel as much as possible, never stop studying art history and always keep your eyes open to soak in the details.

I've always wished there was a TV show that showcased interior design projects other than just private residential spaces. There is a big big world of interior design happening out there that is rarely showcased or celebrated outside of its own industry but yet it influences our lives on a daily basis making our experiences positive or negative, memorable or forgettable.  Personally I can never stop admiring great design in any type of venue and nothing stops me in my tracks like perfectly planned details.


All photos by:   Carol Reed


IDS 2013


I have to admit I was a bit under-whelmed at IDS this year and I think that had to do with the fact that most of the products exhibited were building materials (tiles, wood flooring, plumbing fixtures) and not as much furnishings and accessories - you know, all the *beautiful* stuff you associate with display and decor.  Because of this there wasn't as many interior environments on display nor where there any feature designer rooms to walk thru which I always enjoy viewing.  

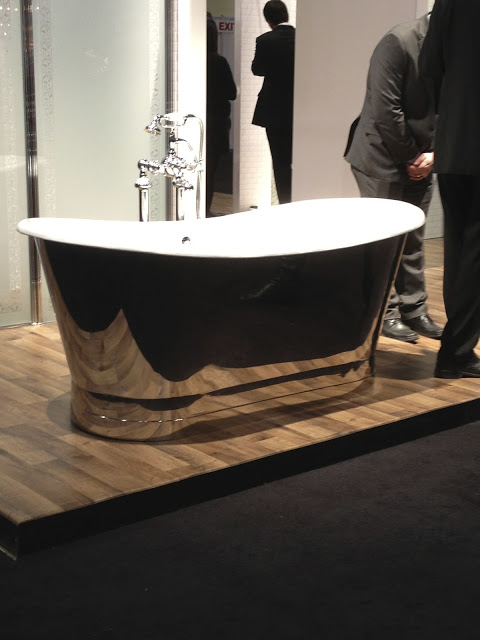
My camera stayed in my pocket for the most part but there were a few things that caught my eye.  Starting with this chrome plated soaker tub (top photo) - its actually the same tub I've purchased for my own bathroom renovation but I went for the all white version (surprise!).  Oh I contemplated the shiny chrome finish for some time but in the end I decided that even as much as I do love the tub in this finish it wasn't entirely suited to the simple, pared down aesthetic I'm after. 


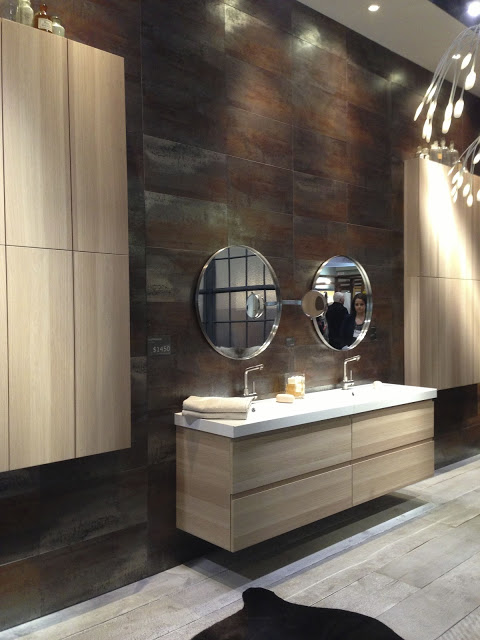
Once again my favorite exhibitor was Ikea.  This was an Ikea bathroom of enormous scale who's concept was derived from the warehouse lofts in Copenhagen.   What I truly loved about this space was that it exemplifies the philosophy of designing with line, form and scale and not decoration.  The pattern, colour and texture is all from the materials themselves in a monolithic applicaiton which is how I like to approach the spaces I design.  I find that with bathrooms in particular people try too hard and they're often just "over done" for my taste.   Too many types of tiles, too many inlays, too many patterns, borders, trendy colours.  If you have a great material to start with, that's enough on its own.  These wall tiles in a distressed metal finish are installed wall to wall and floor to ceiling in a simple grid pattern and the result is so very effective.  The uninterrupted wide plank flooring again is the same concept and the floating vanities and wall cabinets in simple wood slab form create a beautiful composition that's punctuated with a pair of extra large round mirrors.  (These mirrors have been a long time favorite of mine.)


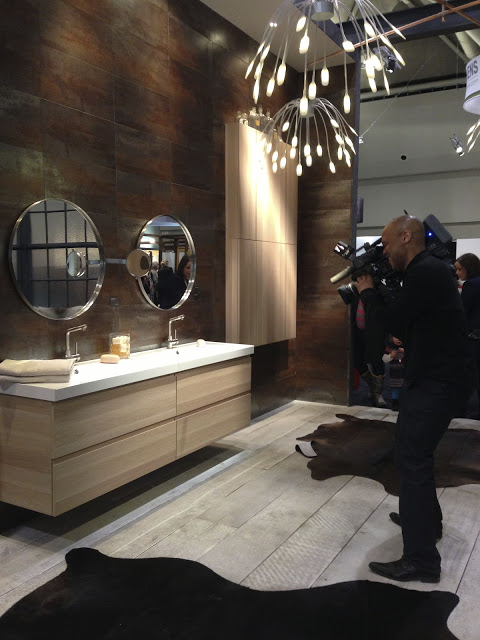
  To give you some idea of scale - those mirrors are huge, see this photo with the camera man.   I wish I had a photo of the other side of the bathroom which features a freestanding copper slipper tub - stunning.


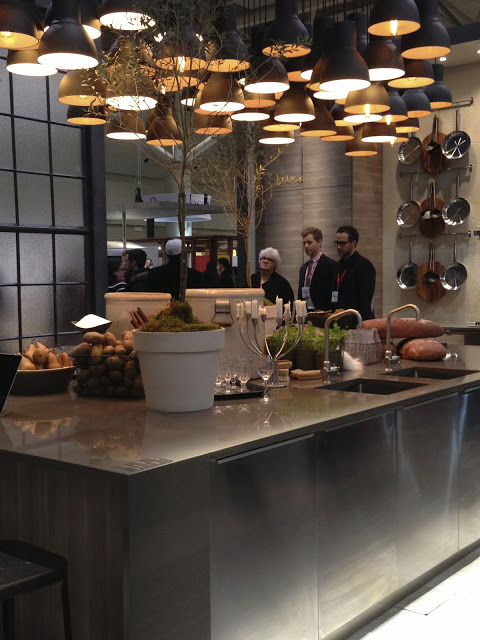
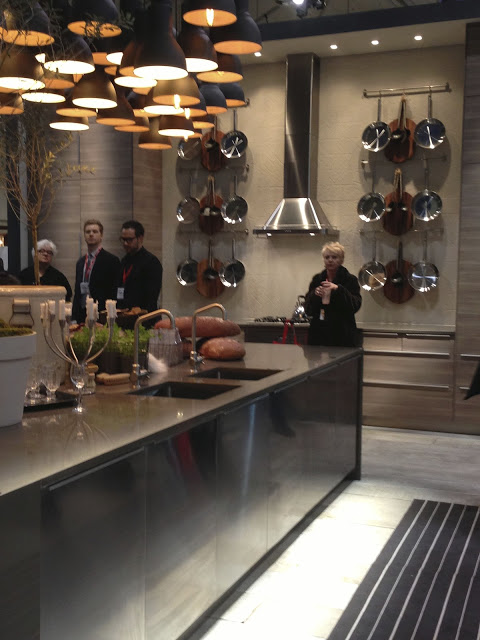
On the other side of the bathroom wall was this gorgeous Ikea kitchen.  Again, the scale was huge with its 20' high ceilings.  My favourite thing about it though was the accessories on the kitchen island, all those large vintage style country crocks and weigh scales.......and those topiaries.  


Once again there was a massive light installation above the island, the Hectar industrial pendant hung in multiples was dramatic.


The Earth Inc. exhibit was also another stunner this year.  At least year's show one of my client's walked thru their booth and was so taken with their work that she hired them to do an overhaul of her 70's bungalow backyard, the first phase was completed in the fall.   A few days after the IDS show this year, I had a meeting at the house and was blown away with the transformation of the back yard.  Work on the front yard begins in a few weeks.


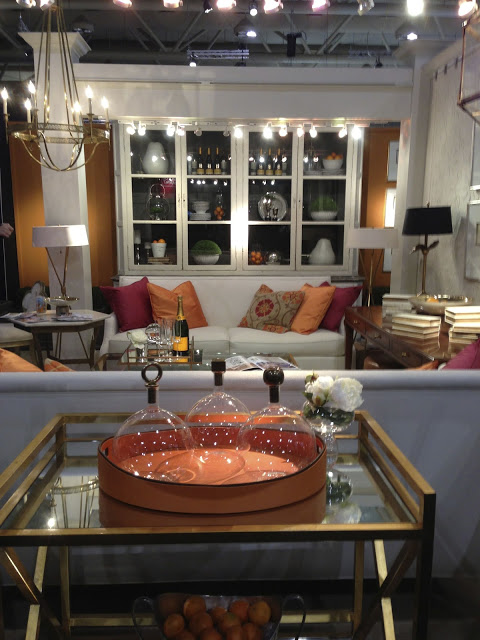
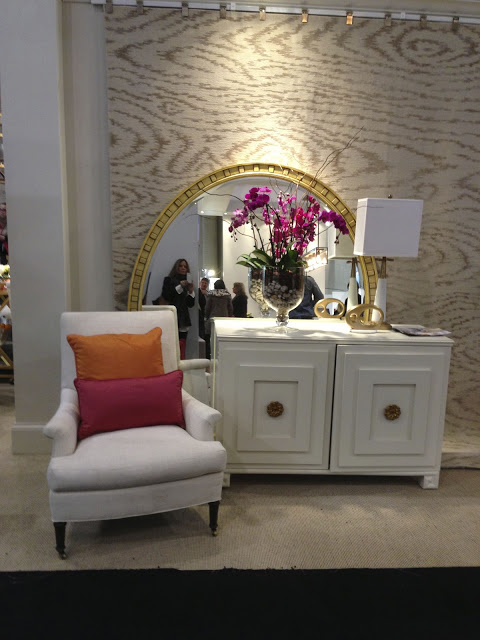
This was one of the few interior settings on display and it was a beautiful space, by Cocoon.  I used to live and work in Oakville and first discovered their showroom years ago - it just keeps getting better and better.   I think the vibe of this space really resonates with a lot of people,  I know a lot of my clients would be drawn to it.  Its based on traditional elements with modern touches.  What I loved most about it is how colourful it is, yet its primarily white.  A great example of how a little bit of colour reads very prominent in what is otherwise a neutral space. 


The parties leading up to and around IDS have become the main attraction of the show, sadly I didn't make it to any of them because I flew in from Halifax mid week then headed out of town for site meetings.  I returned back to Toronto just in time to catch the show on Friday afternoon (and the snow storm).   


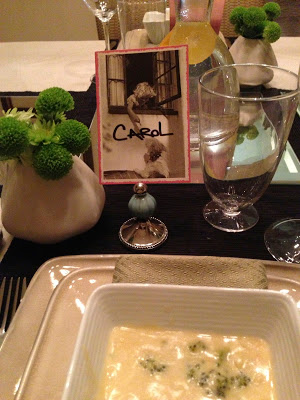
There was no industry party that could top my favourite event of the week - a dinner party with my best girlfriends (who are also all designers btw!).  I am soo lucky to have these amazing women in my life and there is nothing I covet more than when we get together around one of our dining tables.  They always blow me away with their incredible recipes and beautiful table settings, like this one above.  After I left the show on Friday, this is what was awaiting me when I finally arrived (after driving for hours in the snow) at my friends house,,,,not only does she always set the most inviting table with personal touches, she even included individual gifts for each of us (not shown in the photos) at our place settings. There's nothing that makes you feel more special than that.  

I definitely can say I learn more about the design biz chatting with these ladies around the dinner table than I could ever learn at a trade show.  This was the perfect way end a hectic week of design and was the highlight of my IDS day!  : )


All Photos by:   Carol Reed

Victorian Row House: A Designer Reno on A DIY Budget - Part 6


Kitchen & Family Room - Before & After

*Edit February 2015*
I've recently learned this former house of mine is currently for sale on MLS and also has been popping up on some other Toronto websites with links back to my blog posts here, citing that this is still my house and that i still live there.  Just to clarify - I no longer own or live in this house, I sold this house in December 2008.  I want to also mention that because of my blog posts here about my house renovation, that two years after selling it the new owners, (he was fresh out of law school) filed a claim against myself and the Home Inspector for mis-representing the property (after an earlier failed attempt at trying to get money from each of the Broker firms ).   After moving in to their very first home the young new lawyer and his  new wife were not happy with the lack of sound privacy the row house offerred and claimed the real estate listing failed to disclose what the sound levels were. (??).     To make  a two year long small claims court story short,,,,,in a settlement hearing a Judge basically said they didn't have a chance, not a chance of winning any type of settlement in court over this,  it wasn't a new build, it was a 100yr old+  row house and their expectations about what they were entitled to were completely unrealistic.  Caveat emptor.  It took two years of lawyers time to settle that.
*end of edit*


Below are some before pics showing the old 1980's kitchen.  Half of the ceiling was badly damaged from a leak in the old roof, there was no dishwasher or exhaust fan and the cabinetry was rotted and falling apart.  The first photo shows the extent of cabinetry, lowers and uppers along the window wall and a small cabinet over the bulkhead for the basement stairs.  A table and chairs sat next to a freestanding fridge and in front of a long baseboard heater.   We ripped it all out......including the window.  In its place would be a new ceiling, new flooring, new window, new lighting, new appliances and new Ikea kitchen cabinets.


Before - View from Kitchen to DR and LR


Before - View from LR and DR to Kitchen and FR beyond.


It was definitely a challenge coming up with a layout for this kitchen.  It was elevated from the Dining and Living rooms and also had an adjoining family room with a walkout to the deck and access to the garage.  The kitchen spanned the width of the house so the main path of traffic flowed thru the kitchen, thru the family room and out to the only parking spot - in the garage.  What I found most awkward about the kitchen was that the opposite walls were too far apart to make for an efficient work space but it was too narrow for an island or peninsula layout without removing the walls between the kitchen and Family Room - not an option for us.  I wanted to utilize the long wall opposite the sink for full height cabinetry and add an island, even if it would be a small one.  The walls between the kitchen and family room had to stay so I redesigned the layout within the existing footprint.   One of the key elements was removing the baseboard heater and replacing it with a toe-kick heater that fits under the cabinetry on the one wall.  This allowed us to utilized the entire wall for new full height cabinetry.


After - View of Pantry in kitchen looking thru to back door in Family Room.  Toe kick heater under cabinetry.

The view to the back of the house from the LR and DR was directly down the middle of the kitchen and at eye level (because of the elevated floor level) so I wanted an island that was more of a table style, something that was visually light and airy looking and moveable.   Because I had limited time and even a more limited budget, I designed an island that we could make ourselves from stock goods - so the kitchen island became a DIY project.  I purchased a ready made stainless steel top from Ikea (or you could use butcher block) some unfinished solid wood butcher block style legs from Lowes, and a bit of stock lumber.  I planned out the apron size and blocking required and had the lumber store cut all the boards to the exact sizes I needed.  Next I purchased all the fasteners and brought all the pieces home, ready to assemble.  I supplied my 'other half' with the design drawing and instructions and within an hour he had put the entire thing together for me.  To finish it off, all it needed was primer and 2 coats of finish paint.  Super easy and quick!! The entire thing cost less than $300 and I absolutely LOVE the results.  There are so many variations you could do by following the same simple steps.  In an upcoming post I'll provide the design plan, the instructions and list of materials needed.


A new double hung window was installed, taller than the old window and I added a frosted vinyl film to block the unappealing view of the neighbour's house but still allows the light in.  I opted for solid cararra marble counter and wrapped it up the wall 28" for a clean contemporary look. I had planned on adding a long wall mounted shelf with traditional corbel style brackets on the wall to the right of the window but since I had decided to sell the house, I left this open for the new owners to chose if they wanted to do this or not.   To me this would be the perfect finishing touch - a great spot for displaying pretty bowls, plates and artwork but for those who like to cook, its great access to your dishes.


All of the cabinetry was from Ikea, and I chose the simple white Applad door style for a clean contemporary look.  I customized it by adding full height thick gables between each of the cabinets, (which gives the cabinets more of a furniture look) and gave the entire kitchen a high end style by splurging on marble counters and backsplash, an oversized custom stainless sink, great appliances and a unique custom designed island.  The slide in range reinforces the clean lines and the contemporary rectangular hood was a great find at Lowes for only $699.


The light fixture in the family room was by Jonathan Adler but I customized it to have a 6" drop, I loved the black metal detail on the shade and how it ties in to the other touches of black on the window frames and door hardware.


The family room was adjacent to the kitchen, with its walkout to the deck it was a really bright, sunfilled and comfy space with room for a sofa and two lounge chairs and a TV.  I purchased an inexpensive but practical slipcovered sofa from Ikea, hung a small grouping of my own b&w photos, and brought an ottoman and 2 antique apple crates from home to furnish the space for resale.  The pin-up lamps were a STEAL at only $19.99 ea from a building surplus warehouse, they have a fabric drum shade, a swing arm and 3 way dimmer switch.  I've been back several times since to buy more and I'm sorry to say, they are completely sold out now!  The new owners of the house purchased the sofa and the lamps too.

I'm proud to say that this entire kitchen, including all materials, appliances, labour (electrical, plumbing, drywall, cabinetry install, flooring install, fabrication) and all taxes came in at $17,700.  The only work my handyman and I did ourselves in this part of the reno was the demolition, the painting, and hook-up of the kitchen faucet and dishwasher...and of course the design planning.  All in all,,,,I think the quality and value of the end product is much greater than its modest budget and demonstrates that its not how much you spend,,its how you spend it!

Stay tuned for a future post with instructions for a DIY kitchen island.

For Parts 1 thru 5 of this Victorian Row House Reno:


All Photos:  Carol Reed