Kitchens

70's Bungalow: Progress 2


The tile work is almost finished and the hardwood has just started to be installed.  The finish carpenter is on site prepping doors and getting ready to install the base mouldings and door casings.  And the custom kitchen cabinetry arrives this week for installation,,,,,,I'm sooooo excited to see it!!!   I stopped by the job site earlier today to drop some more paint samples off for the Master Bedroom and was thrilled with the progress since I was there earlier in the week and since my last progress post.   The travertine tile has gone up on the Living Room fireplace wall and I LOOOOOVE it (above photo).


The guest bathroom tile is just about ready to be grouted, they have to just finish off adding a Caesarstone jamb around the inside of the window, you can see a small piece of it on the window sill now that the tiler was using as a spacer.  The grid line effect will disappear once the grout is applied.


You can just see a glimpse of the honed travertine floor tile.


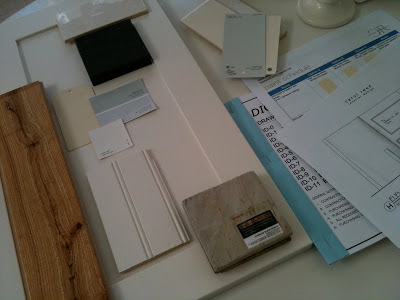
Honed calacatta floor tiles in the master ensuite and paint draw downs on the wall.  Wall tile goes up on Monday (where you see the black backer board).  You can check out the design sketches and finish boards for the bathrooms here.


The powder room has polished calacatta floor tiles and I can tell you the wall paint, is NOT going to be the bottom sample : ).


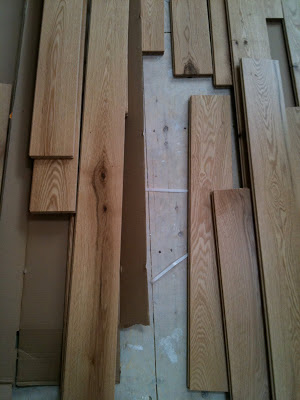
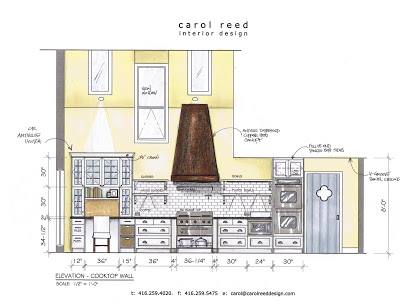
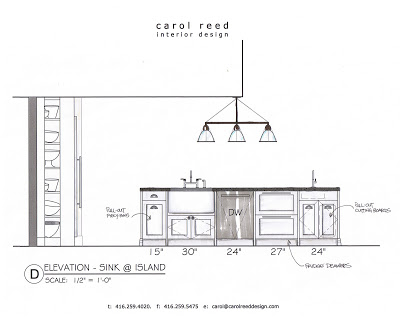
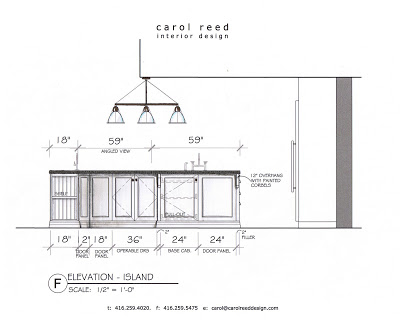
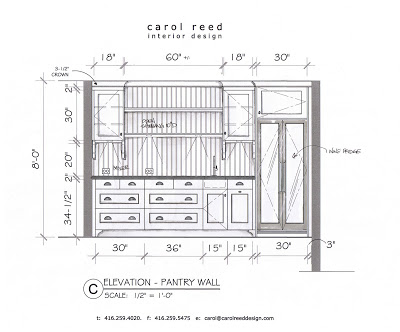
The natural walnut floors were installed in the kitchen and family room yesterday, here's a look at the range wall which is ready for the cabinets and appliances.  I love how the space is flooded with daylight.  For over six months now I've had a clear vision of what this kitchen will look like when its complete but if you want a 'sneak peek' you can check out the kitchen design plans here.


A view into the kitchen from the family room.  If you look close you can see a couple of paint draw downs on the left wall inside the kitchen,,,and I'm happy to say the perfect shade of white has been selected (we'll be painting all the main living areas and hallways white).  Although I have to say, the primer the painter used on this job is the nicest colour of white primer I've ever seen, I would be perfectly happy with that as the wall colour it was really that good - I'll definitely be getting the name of it.


Another view into the kitchen from the family room at the back of the house, I love how you can see the Living room's travertine fireplace in background.


Details make the difference.


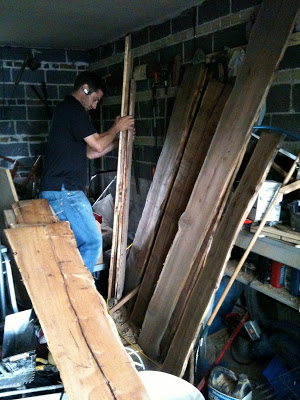
My favorite thing on the entire project,,,,are these walnut veneer doors.  They arrived earlier this week and the wood veneer is simply stunning!!!!  Even now in their unfinished state you can see the sheer beauty of the walnut grain, its like a work of art.   This character and depth of colour will be accentuated even more when the clear top coats are applied.  What you're seeing here is only the top half of the door, there's four doors altogether, bookmatched, and they'll be hung in pairs on the two closets in the front hall.


Stay tuned for lots more progress updates in the days and weeks ahead.


All Photos:   Carol Reed


Gail's Kitchen Reno: Post #3- Progress


Its been 3 months of debris and dust.....finally its time for all the new finishes and fixtures!

After 3 months of demolition and new construction we're finally getting to all the exciting finishing details at Gails' Kitchen.  Just when it seems like things are moving along at a snail's pace, suddenly you hit a point when everything starts to come together quickly with visible progress every day.  Its like Christmas morning each time I visit the site now!!  While the contractor's been working on the new construction I've been finalizing a few design details like the fireplace surround, ordering light fixtures, sourcing some new stools and finalizing the hardware selections.


A couple of weeks ago we purchased the Ikea cabinets which were delivered next day - EDIT:  for immediate delivery you have to pick the entire order in the warehouse yourself.  Otherwise for large orders you should have them pick the order for you which means allow at least 2 weeks for delivery of the order which comes from their main distribution warehouse.


My absolute favorite part of any job is when the primer goes up.  I LOVE to see the new space painted entirely white, in many cases its the only time I get to enjoy the beauty of the whiteness of the space before the clients 'colour' goes up!  Personally I always think the spaces look better in white,,,, but hey,,, its not about what I want because its not my house.


When the hardwood flooring arrived on site I handpicked all the boards.  I specified a character grade wood that has lots of knots but which also means you can get lots of variance in the appearance with some really odd ball pieces thrown in there too.  With this much character in the wood its important that the boards are thoughtfully placed or it could look like a dogs breakfast, so I sort them into 3 piles of bad, good and best.  Instead of tossing out the 'bad' boards I have the installer use them in areas where they won't be visible like under all the kitchen cabinets, under the appliances and under the sofa.


I sampled 7 shades of yellow paint before we could find one that we were happy with.  Yellow has to be one of the trickiest colours of all to get right, it doesn't help that I'm not a yellow person but I appreciate my client's attraction to it.  We applied each of the samples on three different walls and not only did the yellows look drastically different on each wall, the same colour often looked totally different on the same wall.  Looking at all these samples above, except for the two whites the others looked nothing like the paint samples in hand, NOTHING.  From left to right, bottom row we have; BM Creme Brulee, BM Creme Fraiche, BM Affinity Soleil, F&B Cream, F&B House White, BM Cotton Balls, BM Spanish White (LOVE), BM Ivory White (LOVE).  Top row is a second sample of BM Creme Brulee which looks nothing like the sample on the far left.  The homeowner didn't pick either of the ones that would have been my first choice but she's madly crazy in love with the one she did pick!


I was so excited a couple of weeks ago to meet the Coppersmith at the house and review samples of antiqued, hammered copper. He'll make the copper patina to our exact liking and then he'll use it to build us a custom hood canopy exactly like my design sketch - I can't wait to see it!!!!


But before the Coppersmith left the building,,,,,I lured him into the family room and pulled out my design sketches for the fireplace and asked him if he could use that same copper to make a surround for the new fireplace.  No problem he said, piece of cake.  Now, that's the kinda response I like to hear!!  So he'll be back to measure for the surround as soon as the gas fireplace box is installed.


Nothing gets my heart beating faster than found treasure,,, and an enthusiastic contractor. : ))  My clients are currently living in one of their own rental properties during this renovation and in the garage of that house we found stacks of antique wood boards from the previous owner who was a woodworker.  I couldn't believe my eyes when I saw these beauties piled up in the junk pile.  With their live edge and the gorgeous wood grain my mind was realing thinking of all the different ways we could use these.  I sketched up a detail for a sliding barn style door and Tom's going to have these boards made into an oversize door panel, and then,,we'll use the rest to make the mantle for the fireplace.


They started installing the base cabinets on Wednesday....


By Monday we'll be ready for the counters to be templated.  


Meanwhile the cabinet doors and drawer fronts are off getting sprayed a perfect shade of white.  Check out this post for all the details we have planned, and check out this post for step by step process of how I have Ikea cabinets custom sprayed (note this is not a DIY project!).


Stay tuned for more updates over the next 4 weeks as this dramatic kitchen, family room transformation comes to completion. 


All Photos:  Carol Reed

Gail's Kitchen Reno: Post #2 - Customizing Ikea


Gails' kitchen and family room renovation is a project of mine that's currently in the early stages of construction. I first posted about this kitchen and family room renovation a couple of weeks ago and if you missed it, you can go here to see all the before pictures and read all about the objectives for the redesign and the process behind developing the final proposed layout.  Here's another look at the new floor plan....


Its quite an extensive renovation with lots of new construction and reworking of plumbing and electrical so one of the ways to achieve everything on the wish list (quartz counters, high end appliances, all new floors, additional sinks, new fireplace etc. etc.) and stay within the clients conservative budget range is to use Ikea cabinets as the basis for the kitchen design.  In this post I won't bother going into all the reasons why this makes so much sense as I've written about all the reasons Why I love Ikea Kitchens here, and its for all those reasons why my client and I came to the decision to take this route for her new kitchen.   Also in that post you can find a list of my favorite ways to customize Ikea cabinets and give it a bespoke look - I'll be implementing all of those tricks in this installation too.   

When planning a kitchen based on Ikea cabinets I treat the base cabinetry like building blocks,,,or legos and configure them in any which way I need them.  There's really not too many limitations as they offer such a wide range of cabinet sizes and styles.  Since this kitchen will be more on the relaxed trad side than the modern side,,,,,I recommended the Tidaholm door style which is a simple shaker style door in natural oak.  As I've mentioned previously I prefer this door style over their other shaker door style the Adel, because the Tidaholm has a cleaner squared edge shaker profile and joinery corners.  Also its key, if you plan on painting the doors the oak doors take a new paint finish better than the Adel door style which is a synthetic polyester finish.  And for this project, we definitely intend on painting them!


The Cooktop Wall:  Essentially this is the main wall in the kitchen which houses the rangetop, exhaust hood and wall ovens.  This was a major change from the old kitchen layout which had a cooktop poorly (and dangerously) located on a narrow island.  I always place ranges or cooktops against walls where ever possible and try to allow counter space on either side.  In this configuration we have lots of extra deep drawers which will accommodate pots, pans, small appliances, mixing bowls, cookware, as well as spices, seasonings and utensils and knives.  The open shelves will house most of the dishware with additional pieces in the glass fronted hutch.  The shelves will provides easy access for Gail (who is a chef) who's always cooking for a crowd.  I've incorporated a desk space for her laptop, cookbooks, messages, and household bills.  I'm on the lookout for an old antique wall hutch that we could use above her desk surface but its not something you can easily find on a deadline, so in this elevation I've illustrated the backup plan which will be new glass fronted wall cabinets with a blue accent colour painted on the inside.  The range hood canopy will be custom built and we're planning on cladding it in an antiqued distressed copper,,much more blackened in appearance than shiny new copper.  (sorry but the colours depicted in this renderring are not quite accurate, the walls will be a very soft fresh pale yellow, all the cabinetry a warm ivory white).


The Island:  The sink side of the island is of course directly opposite the cook wall and despite how large the island is, I still couldn't fit everything in that Gail ideally wanted, but we're as close as we could get.  They'll be a Shaw farmsink, a second prep sink (that was a must!) and a set of refridgerator drawers.  Its these fridge drawers that really make her prep zone and cooking zone work efficiently, she can keep all her dairy and veg here, where they'll be right at hand instead of in the large main fridge.  The biggest challenge about this island has been trying to light it, you can't help but notice it only has a ceiling over half of it! The ceiling goes from 8' in the kitchen area opening up to 20' in the breakfast nook area so its a bit a challenge.  The situation just became more challenging when last week we discovered a new beam would need to be dropped exactly where I've got the light fixture hanging........


The Island:  On one end of the island they'll be another set of wide deep drawers and the other three sides of the island will be clad in a combination of operable doors and fixed door panels all finished off with a baseboard treatment around the bottom instead of a toe kick.  On the seating side of the island I'll be supporting the overhang with some simple corbel style brackets and also adding a small bookshelf unit with beadboard backing.


The Pantry & Bar:  Like the island, this section of cabinetry will be tricked out with additional trimwork to give it more of a furniture look, so in addition to the Ikea base cabinets the contractor will be installing beadboard back panel,,,corbel brackets and corner block details to the base, and built in recessed puck lighting.  I have to admit this elevation is a moving target right now,,,,its actually been changed several dozen times, probably 2 or 3 since this version was drawn.  The size of the wine fridge was the subject of many debates between my clients and my recommendation for a tall but narrow unit ultimately was vetoed for this double door style.  As for the cabinetry, Gail's been quite conflicted as to how much open vs. closed storage she can live with and I predict we'll be going back to one of the original pantry configurations I proposed which had more upper cabinets, less open shelving which will be more practical.   Right after this is posted I'll be working on one more variation of this wall.


Coming up next I'll share some images of the concept board for the space illustrating all the finishes and fixtures I've specified for the space along with some updated site photos.  

Next week I'll be writing a separate post outlining my tips and advice for painting your newly ordered Ikea cabinets based on the process I've used successfully.  I've had several people inquire about this so please know I havn't forgotten and I promise you'll see it next week.


All Images:  Carol Reed