Powder Rooms

Grey Scale: Powder Room


Clients powder room in various stages of progress.


I was sorting through room photos of past projects and came across these images of a powder room from a recent renovation, the 70's Bungalow project.  It dawned on me that I hadn't ever posted any photos of this room before, probably because its just such a difficult room to capture without a wide angle lens.  Like the entire house this room underwent a complete gut so we started with a clean slate - dark grey slate in fact which I chose as a wall colour for the small room.  


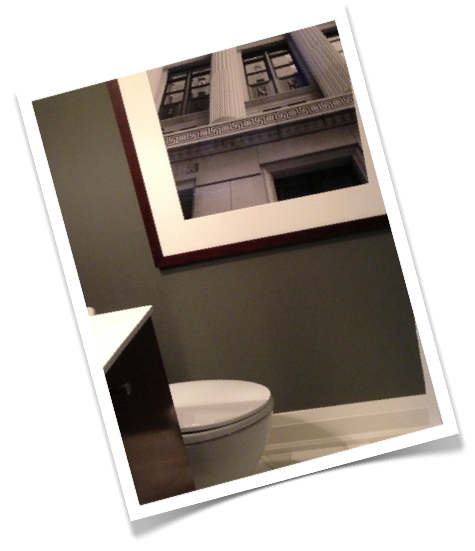
Small rooms are the perfect spaces to play up drama and scale - whether its a large print wallpaper, deep paint colour or graphic floor pattern, going bold will have lots of impact and kick the wow factor up a notch for your guests when they excuse themselves to powder their noses. It makes the entire experience a little more special.  : )    The drama in this little room doesn't come from the colour, its neutral in that sense but the walls are deep and dark and quite a departure from the rest of the home's all white modern interior.  The large calacatta marble floor tiles have beautiful dramatic veining.   


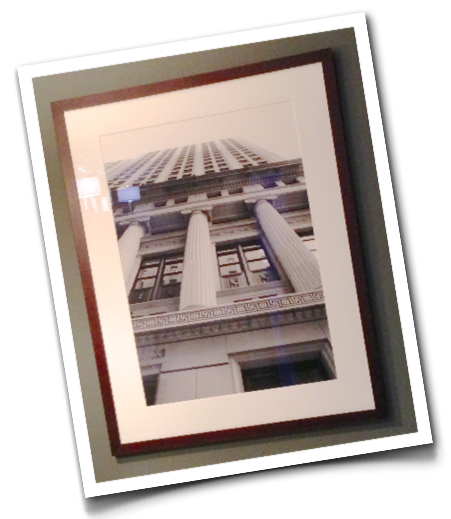
A bevelled tray mirror adds some elegant sparkle to the dark room but the floor to ceiling bare grey wall was crying out for a piece of artwork and I wanted large scale.   What I had completely forgotten about until I came across these room photos the other day was that we had one of my own photographs framed and hung on the wall.   For this room it was an affordable alternative to what would have needed to be a very large  original piece (or a smaller pair) of art.  I sent my file to Elevator Digital and once again, Kevin worked his magic on it to make sure when it was enlarged that the image quality was maintained and then the print was beautifully matted and framed.

The photo chosen was from a series I took of buildings on Wall Street when I was in NYC two summers ago. The homeowners have both travelled to NY for business over the years and now have a son who lives in Manhattan, they're pretty fond of the city and were quite taken with many of my architectural photos.   Its hard to tell from this not so great snapshot but the size of the framed piece is over 3' wide and over 4' tall.  Its not actually a black and white image but the colours are all monochromatic greys that it reads that way.  My favorite thing about this photo is the perspective,  its so dynamic that it brings an amazing sense of depth to the room. 


There's been lots of finishing touches and a massive landscaping overhaul happening at this house over the past year so they'll be more after photos coming soon.


Room Design and all Photos By:  Carol Reed


Victorian Row House: A Designer Reno on A DIY Budget - Part 3


Basement - Before & After

*Edit February 2015*
I've recently learned this former house of mine is currently for sale on MLS and also has been popping up on some other Toronto websites with links back to my blog posts here, citing that this is still my house and that i still live there.  Just to clarify - I no longer own or live in this house, I sold this house in December 2008.  I want to also mention that because of my blog posts here about my house renovation, that two years after selling it the new owners, (he was fresh out of law school) filed a claim against myself and the Home Inspector for mis-representing the property (after an earlier failed attempt at trying to get money from each of the Broker firms ).   After moving in to their very first home the young new lawyer and his  new wife were not happy with the lack of sound privacy the row house offerred and claimed the real estate listing failed to disclose what the sound levels were. (??).     To make  a two year long small claims court story short,,,,,in a settlement hearing a Judge basically said they didn't have a chance, not a chance of winning any type of settlement in court over this,  it wasn't a new build, it was a 100yr old+  row house and their expectations about what they were entitled to were completely unrealistic.  Caveat emptor.  It took two years of lawyers time to settle that.
*end of edit*

The basement of this old house was completed finished space when we purchased it, except for the crawl space area at the front of basement which only had a drywalled ceiling.  Despite the fact it was finished it was in nasty shape due to years of neglect, water penetration from a poorly situated down spout and an unusually large gapping hole in a window well.   The best part about the basement was the clear high celings in the main areas.  Below are the before and after plan views.


Basement After - bottom of stairs, new powder room door on right.


For some reason, I didn't have any before pictures of the main area of the basement, but it was drywalled and painted burnt orange and yellow like the upstairs (see previous posts for Part 1 and Part 2 ) and had wall to wall carpet that was moldy and urine stained among other things.   I made the landing area at the bottom of the stairs a little larger and planned for this area to serve as a coat and shoe zone since the front entry upstairs didn't have a closet.  I relocated a pair of existing french doors (originally from the kitchen) with leaded glass for the entry to the main room - this room could potentially serve many purposes, it could be a bedroom, a home office, a home gym, a play room or a media room.  The doors gave the space character and made the basement level feel larger by creating this 'view' thru glass doors to a room beyond.  With the addition of drapery panels or frosted film, the doors could also allow some sound and visual privacy from the upstairs and the laundry area.

The entire landing area and back into the laundry room was finished in beadboard panelling.  Even though the interior of the house was going to be mainly contemporary I wanted to mix in a bit of nostalgic victorian era charm.  So the all white walls were given the beadboard treatment, door hardware was oil rubbed bronze and I chose shoolhouse fixtures for the ceiling and an industrial lantern style for the laundry room walls.  Originally I had planned on carpeting the basement but later decided to tile it so that if there was any water penetration in the future, it would be visible and noticeable.  I went with a classic natural slate 12 x 24 tile in an offset brick pattern with plans for a large plush area carpet for the rec room.

Below are some before pictures of the basement bathroom and laundry room.  The bathroom wasn't functioning, the toilet and sink both drained onto the floor and the ceiling height was only 6'.  The laundry room also only had 6' high ceilings and was small and dark.  The design plan was to relocate the powder room to where the large closet area was located at the bottom of the stairs which had full 8' high ceilings and would in turn gain us a larger laundry room.

Before Powder Room, you can see the black water line on the vanity.


Before Laundry Room, awkwardly placed sink and no counter space.

After demo'ing these rooms we ended up taking down all the drywall on the walls in this area because it was in such bad shape it wasn't worth the time or effort to patch and repair it.  In order to relocate the toilet we had to dig up a small section of the concrete floor to run the new drain and the removal of the old quary tile left the concrete subfloor in pretty rough shape too.  We ended up with about 35 sf of new concrete floor to pour and patch after the new plumbing work was complete.   Thanks to a contractor friend of mine who suggested we could 'easily' do this ourselves,,,,,,,,I convinced my brother that we should give it a try (perhaps it was the beer?).  So with my friend's instructions and a list of materials my brother and I eagerly headed off to Home Depot to get our supplies.  Needless to say before we even finished trying to load 15 bags of Sakrete onto our cart at home depot........we began to have second thoughts.

If you ever tried to lift a bag of Sakrete, you'll understand why i suddenly began to curse my so called friend.  I instantly felt bad for getting my brother into this because while I'm sure 2 men could 'easily' handle this task,,,,,,,,one strong handyman and his petite designer sister,,,,,,um, not so easy.  I'm pretty strong for my size, but with all my strength I couldn't even budge one of these bags let alone lift one.  And its a good thing we had a truck with heavy duty suspension because any normal vehicle would bottom out with this load.  15 Bags of sakrete mix, is just over half a ton.

We then, ok he, managed to get the bags of concrete into the truck, out of the truck, in the house and down to the basement where we figured out a game plan.  We built a mixing station out of plywood with 2 x 4's sides and just mixed right there.  I took on the task of doing all the mixing, manually, eventually determining that a 'cookie dough' consistency worked perfectly, and Six did the pouring and trowling, levelling.  Not even half way thru I thought I was going to die, my arms felt like they were going to fall off - but I couldn't stop, once you start there's no turning back, we had to keep going.  It didn't actually take too long, maybe 2 hours and we were done, but it felt like 10hrs!

 
Here we are, after completing the floor, Six was checking the height of the drain to allow for the thickness of the new floor tile.

Leaving my mark in a freshly poured concrete floor.....it took 3 or 4 weeks for my arms to recover after this little DIY project.  Never again....


During appliance installation.  New tiled floor and beadboard walls.

I knew I wanted a front loading washer and dryer combo so that I could put them under a long length of countertop.  We planned the room so it would be 8' wide to accommodate an 8' length of ready made countertop.  This is the only counter in the house that was laminate but it didn't make sense to me to go high end here,  I chose to put as much of the laundry room budget into the appliances as I could instead, these front loaders by Amana were the best value I came across for glass front doors on both the washer and dryer.

The decision to clad all the walls in beadboard meant that we didn't have to hire a drywaller to finish the room so this saved us time and money, but ideally I just loved the look.  I first painted it all white then opted to paint the back wall a turquois coloure by Ralph Lauren.  A bold colour choice for me that's for sure, and while I liked it, I know if i was living there now it would be back to white or perhaps a dark charoal colour. : )   Because there was no window in this room, I added a mirror over the sink ($35 from Homesense) which really created the effect of a window and helped relfect more light.  The counter top had a nice thick aluminum edge which worked well with the stainless steel cabinet doors, shelf brackets and trim on the appliances.  The cabinetry, counter, sink, faucet, shelf and baskets were all from Ikea and totalled about $600.

After Laundry Room - this is the same corner of room as shown in the concrete floor photos above .  Because front loading style appliances are higher than the conventional style, your counter will need to be higher than the typical 36"h counter, make sure you use the 6"h feet on your cabinetry to accommodate the extra high appliances.


After Powder Room

The new powder room had nice high ceiling space and comfortably accommodated a vanity and elongated Toto toilet.  I chose a vanity that came with a carrara marble countertop and sink included which was less expensive and faster than buying and installing these elements separately.  I deliberately chose a vanity over a pedestal sink so that there was some storage space. One of my favorite faucet sets is this one by Rubinet which is the best quality wide spread set I've come across in the less than $250 price range.  It has a very classic look to it in its polished chrome with facetted detail.

I chose a tray mirror to add a little sparkle, and because I planned to install wall sonce lighting, the proportions of this mirror were perfect at 22"w x 30"h - it left just enough room for the light fixtures.  But at $220 this mirror was definitely a splurge.

I added a crystal knob to the dark brown freestanding vanity.  You can see a bit of the floor in this photo,  it was a white hexigon with a black border, a touch of classic victorian.


In powder rooms I like to use dark colours or dramatic wallpaper, here I opted for a deep charcoal grey paint.   Its a tiny room and this deep colour created some graphic contrast and made the dark wood and carrara look really elegant, a nice space for guests to use!

It was difficult to photograph this powder room and unfortunately I was using my old point and shoot camera so the photos aren't the greatest quality.  The wall sconces make the room feel very elegant and give off a warm soft, complimentary light.  They were a steal at only $42 each at Union Lighting .  Its always tricky in a renovation to pre-plan for wall sconces when you havn't selected a fixture yet.  When my electricians were on site months earlier, I had them just leave the wire for the lights coiled up in the location I specified.  My drywaller boarded up the room and later when I purchased the sconces and I knew the exact size of my mirror, and where the lights would go,,,we marked it out and used a hole saw to drill exactly where I wanted the sconces.  Once the holes were drilled the wires were easily reachable so we could hook up an old work style j-box to mount the fixtures.


Stayed tuned for Part 4 of this Victorian Row House Renovation where I'll post before and after photos of the 2nd floor bedrooms and bathrooms.


All Photos:  Carol Reed