How To Swag A Pendant


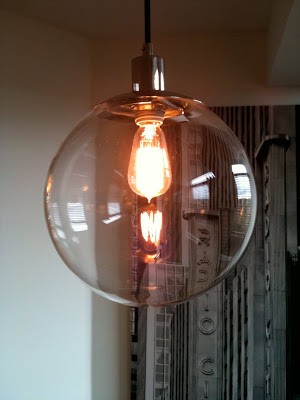
Its a simple pendant, a large round clear glass sphere with a polished chrome canopy, suspended by a thick black cord - evoking a bit of a modern industrial look.   Its the globe pendant from West Elm, its super stylish and super inexpensive, what's not to love?  

Way back in January when I was just beginning to source items for Brian's Condo, I knew this would be the perfect fixture for  his place, specifically for over his small dining table in his open concept dining/living room/kitchen.  Unfortunately, hundreds of other people love the stylish good looks and low price of this fixture too because the West Elm Toronto store was completely out of stock with the next shipment not expected until mid to late March (completely sold out when it did arrive btw).   Aaaggghh.  But I was determined to get my hands on one of these globe pendants, somehow, someway, afterall there were two of them hanging in the showroom and I only needed one.  But no matter how much begging and pleading and negotiating I did (why do you need two fixtures on display??)  they wouldn't sell me one of the floor models despite how much money I spend in their store and how desperate I was to meet a looming deadline.  

With my trade account I did manage to order one of these lights from the states but it was no easy task.  Don't ever attempt to order things from West Elm online because in Canada you'll get nowhere online ordering without a US shipping address and a US credit card. No problem, I had a US shipping address I could use so next I arranged for payment thru my trade account.   Good news, the fixture was in stock and arrived at my US destination within 2 weeks.  I make regular shopping trips to Buffalo so I picked it up the next time I crossed the border,,,,unfortunately due to my crazy schedule I didn't make it to Buffalo until March but at least I knew the pendant was sitting there, waiting for me to come and get it,,,,so much for my deadline.   *EDIT Nov.2013*  West Elm now ships to Canada thru their website.

Picking up the fixture was an experience in itself, it involved an unmarked warehouse, surrounded by barbed wire and surveillence cameras, hidden amongst a quite residential side street.  I'm not even sure that it was all legit (I mean,,there wasn't a trace of paperwork) I didn't ask any questions, I just grabbed my goods and headed for the border.   It was actually a client of mine who put me on to this place and I owe her a big thank you - its an EXCELLENT service.  

Back at Brian's place he'd gotten used to not having this light fixture and he wasn't planning on hosting any dinner parties anytime soon so there was no panic for it - good thing!  Before we could have it installed I still had to pick-up a filament light bulb for it, these are perfect when you have a completely exposed light bulb and you want that vintage industrial look.  This proved a bit challenging to find as they weren't available at the usual lighting showrooms, but luckily I did find a selection of filament bulbs at Morba who always have a great stock of decorative bulbs.   *EDIT Nov.2013*  Home Depot and many retailers now carry filaments style bulbs.

Next Stop, Home Depot.  I needed to find something to use to swag the pendant over the dining table.  Normally I try to avoid having to swag any light fixture but there are many circumstances where its just unavoidable,,,,condos with concrete ceilings mean you can't relocate junction boxes and often times in houses there are ceiling joists or ductwork in the way, othertimes its just not feasible to make new holes in the ceiling so the light has to be swagged.  I've decided its better to live with the 'swag' then to not have the light fixture where you need it.   Swagging a chandelier is fairly easy, chandeliers typically hang by chains so you can simply install a hook in the ceiling (reinforced to handle the weight) and hang the chain from the hook.  I've never been able to find a good looking hook though, all you can ever find anywhere are the same ugly ceiling hooks they've been selling for 40 years.
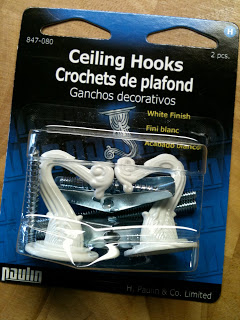


Ugly ceiling hook.

This type of ceiling hook wasn't going to work for Brian's pendant.  Never mind the style, this type of hook just doesn't work with pendants because they're normally suspended by cable wire, or a plain electrical cord - there's no chain link to loop over the hook, a plain cord swaged over this type of hook won't hold the fixture in place.  This is a problem I've come across several times but this time I was going to find a solution that would do the job and look good!   I spent a good hour and a half scouring the hardware department at Home Depot in search of something,,,,,,,,the sales associates were not of much help, they directed me to the 'ugly ceiling hook' shown above.  Finally I came across a little device which in theory seemed like it would work so I was all set to give it a try.  My handyman was not as optomistic,  he bought the ugly ceiling hook too just in case (?!), he figured if all else failed he could just loop the cord around the hook.  Ummm,,,,,no he wouldn't I thought, not on my watch.  


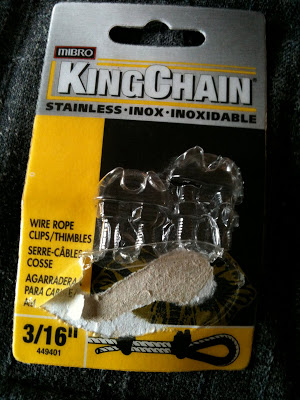
This was my solution.  Sorry, the only picture I have is the empty packaging because the installer got ahead of me,,,but I found this device where they sell rope pully's and rope connectors.  I don't know if there's an official name for them, as the package states they're called wire rope clips and are available in various sizes, the 3/16" works perfectly for a pendant cord.  The package comes with 3 pieces, a bent metal loop and 2 adjustable u-shaped clamps.


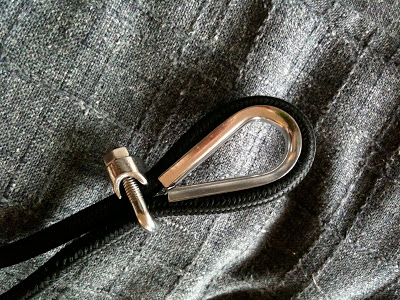
Here's a photo of the pendant cord with the device attached, you can see the reason for using this is that is creates a loop out of the cord and the clips secure the looped cord in place.  The stainless steel colour of this metal happened to work well with my Globe Pendant because the cap and the canopy on the fixture were polished chrome.


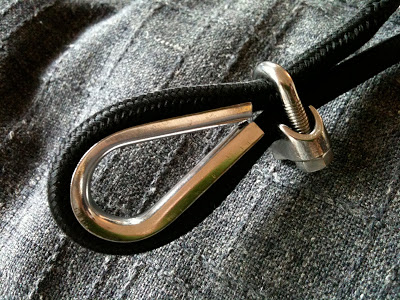
The package comes with 2 of these threaded fasteners but I only wanted to use one and it worked well.  Once the washers on this clip are tightened up, you have a secure loop ready to hang.  This step took about 30 seconds.


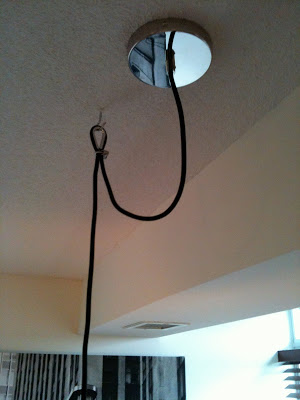
Here's a look at the hook we used in the ceiling.  Its a simple metal cup style hook.  The ceiling is concrete and a plug was used to ensure the threads of the hook would hold securely in place, because the plug was red and there were no canopies available for this type of hook we just painted out the end of the plug with white paint and it disappeared.


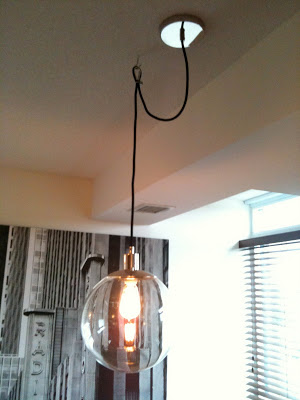
And voila.  Here's a shot of the installed pendant.  You can see there are still some slight kinks in the cord but those will relax over time.  This Iphone photo actually doesn't do justice, this looked even better in person and the entire loop and hook assembly looked like it was all part of the light fixture's design.

So there you have it, this is my new favorite way to swag a pendant.  I don't suggest this type of hardware will work with all styles of pendants but I think this method works perfectly with an industrial style, or rustic type fixture.  I'm happy to say that Brian is thrilled with his newly installed dining room light,,,,,but wasn't the least bit interested in hearing about how I got done!  


All Photos:  Carol Reed

Archives: Family Bathroom


This family bathroom I designed 3 years ago,,,installation was completed about 2-1/2 years ago,,,and these photos were taken back in the fall of 2009.  We've added some more accessories since this picture was taken (its true, a room is never done!).  The project was a back to the bricks complete gut and reno, I designed and specified everything in this bathroom right down to the custom vanity and window coverings.  To this day it remains one of my favorite bathrooms..... but I wish I could capture the etheral 'feeling' of this room on camera.  There's something about the natural light and the colours and the materials, I find the combination is so serene and calming. 

Happy Weekend!


All Photos:  Carol Reed


New Project: Gail's Kitchen Reno


It all started back in December of ’09 when I had my initial meeting with a new client to discuss their kitchen/family room/mud room renovation, a back to the bricks complete overhaul.  They’d been dreaming of this kitchen overhaul for close to 15 years and suddenly it was now or never,,,,,,it was time to either redo these spaces or go in search of a new house that had a kitchen and family room that better suited their needs.
The house is located in the picturesque town of Oakville (west of Toronto) and is an old stone tudor style house situated on a huge treed lot.  The three areas that I was going to be redesigning -  the mudroom, the kitchen and family room made up the back of the house which was a rear, 2 storey addition built in the β€˜80β€˜s and done by the previous owners.  
Before: Here’s a plan view of the kitchen and family room as it existed when I first met the homeowners.


Part of the kitchen opened up to a tall vaulted cathedral ceiling, but spanning straight across this tall ceiling space was a catwalk.  Immediately upon seeing the kitchen the first thing I thought was - that catwalk has got to go!   Its never used, it leads to an unusable rooftop deck, it detracts from the 20’ high ceiling and is just collecting dust.  From a design perspective it had no redeeming qualities or purpose.
The Design Brief:  Gail is a home chef who used to cater private functions but now cooks only for her own family and friends,,,,,,,,,with 3 young adult daughters, a dog and an open door policy to neighbours and friends - its a crazy busy house and the party is always in the kitchen.  Pop in on any given Friday, Saturday or Sunday night and you’ll find her cooking up a feast for 12 or 20 people, usually all spur of the moment and impromptu!  You've seen the existing floor plan shown above, now here’s a glimpse of what their old kitchen looked like for the past 15 years.


Yes, that's a catwalk on the upper left!


View from the family room to the kitchen.


View from the kitchen to the family room.

You’ll understand from seeing some of the photos why this combined kitchen family room space just wasn’t working for them - improvements were needed all around, new flooring, better layout, more counter space, more seating space, larger capacity appliances, a second sink, better lighting,,and in general a kitchen that was current and fresh looking and that was more in keeping with the character of the century old house.

The deep saturated multi-coloured walls, seashore collectables  and open cabinets made for lots of visual clutter.  

My vision:  A lighter fresher colour palette with relaxed coastal charm, lots of white cabinetry, painted beadboard, distressed wood floors, classic fixtures and pro style appliances.  In otherwords, good-by generic dated, golden oak builders kitchen with its santa fe colour scheme....hello Something’s Gotta Give,,,,,,,,,,,or,,, something along those lines.  The set design of the Hamptons beach house for the 2007 movie Something's Gotta Give was by far the biggest star of that production - it was even featured in  Architectural Digest, taking on an iconic status.  That house spawned a renewed appreciation for relaxed traditional interiors, particularly the classic white kitchen - and that's exactly what Gail's house needed.  


SGG Living Room as seen in Architectural Digest


Diane Keaton on the set..


Diane Keaton and Jack Nicolson on the set.....

If you're a decorating or design junkie and you havn't seen this movie, its worth buying, not renting, buying. I have the dvd (given to me by a client who was building her own SGG inspired weekend house on Lake Simcoe) and I've watched the move dozens of times, just to admire the interiors.

The Design Concept:  Gail's house is not a formal style house, it probably was a cottage originally so it has more informal, pared down architectural detailing.  Because she loves to cook and cooks a LOT, this kitchen needs to be highly practical and functional with pro style appliances and must have seating for lots of guests.  The homeowners vision was not immediately as clear as mine however, but only because she hadn’t seen the movie, seriously, - SHE HADN’t SEEN THE MOVIE β€œSomethings Gotta Give”!  Regardless, I knew from discussions with her and her love of all things traditional and her ADDICTION to all things beachy that she and I were on the same page.  She rented the movie the following week and like millions of others, fell completely in love with not only the kitchen, the entire house.  Now you might think,,,yawn, boring,,nothing new or cutting edge here, a classic white kitchen - but really, for someone who’s only ever had one kitchen that looks like above,,,,this IS all new and would be beyond her dreams.  Just because its a style that’s timeless it doesn’t mean it has to be boring, when traditional is done right it should be new and current looking - it should be magical.  Besides, its really only the overall character of the SGG kitchen we’ll use as inspiration by maintaining several of its main elements;  traditional white cabinets, dark counters, stainless steel appliances, white subway tile backsplash, vintage inspired fixtures.  The rest of the details will be unique to Gails style and her space.  We’ll be incorporating a light coloured wood floor, soft buttery yellow walls, a dramatic range hood canopy and wall shelves instead of glass fronted cabinets.   This is going to be one dramatic transformation!


The Final Plan: After exploring more than a dozen layout options, this was the winning plan.   Along with the catwalk, the walls around the pantry area will be removed, making room for a large convergent style island and a long pantry/bar wall.  The existing kitchen table will be reused and ideally butted up to the new island to form one big continuous seating arrangement for chef’s table style dining or for spreading out buffets.   The addition of a second prep sink to the island was a difficult one to accommodate but one that Gail concluded was a must have.  The existing fridge is being reused, despite the door swing which has always swung the wrong way, this is something she's learned to live with, a full height freezer tower will be added next to it.  One of the keys to this layout working efficiently is the addition of refrigerator drawers in the island directly beside the prep sink.  These drawers will be used for veg and dairy so they're right at hand in the prep zone which reduces the frequency of going to the main fridge.  

It was a challenging kitchen to design because of the traffic flow, with multiple doorways and staircases leading off the kitchen and a change in floor level, there were definitely a lot of obstacles to work around and loads of requirements to meet.  But I think with this plan, we managed to tick all the boxes and meet the budget!

The final design plans and material selections were completed in early March and the search for a contractor began...


Set of working drawings and material sample board for the site.

After going thru a lengthy bidding process we were fortunate to get an amazing contractor on board (one I've worked with before). He's as enthusiastic about the new design plan as Gail and I are, he brings a positive energy to the project and so far has been a pleasure to work with.  Demolition took place a few weeks ago and the new construction is well underway.  We had our first regular site meeting yesterday and as you can see from the photos below, the space is looking better already!


The catwalk has been removed.


Stay tuned, next week I'll be posting more design drawings of the kitchen illustrating all of the design details we're incorporating and the new cabinetry configuration.  Following that I'll be posting about all the new lighting and plumbing fixtures and photographing the progress on site.

Oh and by the way,,,,did I mention this was going to be (yet another) Ikea kitchen!  Or 'Bespoke Ikea' as I like to call it.