E-Design

E-Design Bathroom: Before & After Plan


When Janice contacted me regarding her bathroom reno a couple of years ago, she was in the same predicament as most who reach out with inquiries to me.  Her and her husband, who live in a century old victorian in downtown Toronto, had been planning on renovating their main bathroom for quite some time.  She had the budget in mind and a contractor lined up but they didn’t have any plans or specifics to share with him.  They had some ideas in their head about what they wanted but ideas that they just weren’t sure about. That’s were I came in. Or should I say, that’s when Janice’s bathroom arrived in my in-box and we began the e-design process.

Here’s a look at the floor plan before the reno.  This main family bathroom and laundry room are located on the second floor, in the middle section of the house.  Typical of Victorian row houses of this period, the house is long and narrow.

Bathroom Floor Plan - Before

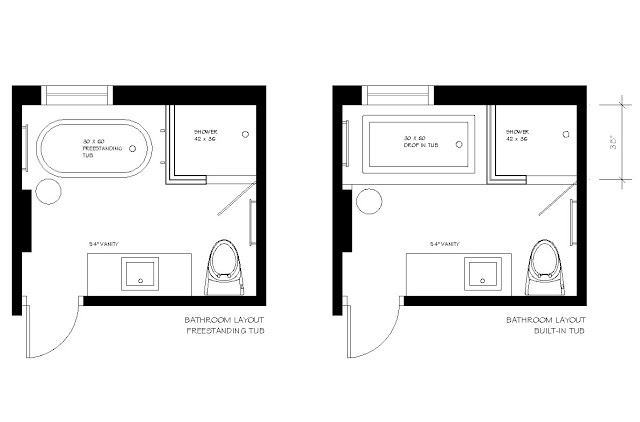
I imagine at one time this used to be a smaller bathroom and a bedroom and then sometime in the 80's somebody converted a bedroom and moved the laundry upstairs.   In any case, both the laundry and bathroom were in dire need of updating and improvement.  The main objective Janice wanted to achieve was a larger bathroom to accommodate 2 sinks and a separate tub and shower.  Her initial idea/request for the re-design was to remove the wall between the rooms and combine everything into one large shared space. 

There's too many reasons to list here why I didn't think combing the two rooms into one was the best option; for practicality - the noise and smell of laundry, soaking, hang drying etc...not to mention the enormous square footage of the space would make it too costly to finish to the level she wanted to achieve in her bathroom.  Also in my opinion deleting the separate laundry room for a shared bathroom would be a downgrade to the home not an upgrade.  So I worked up a few different layout options for her with the intent of keeping the two individual rooms.  Here's a look at the final plan.


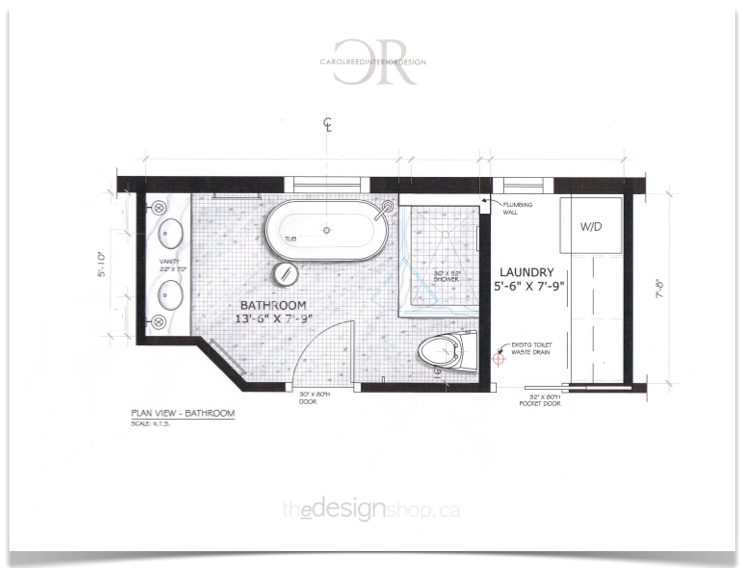
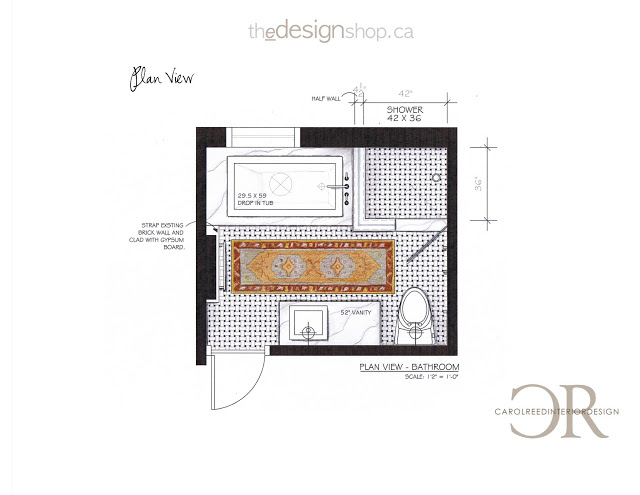
Bathroom Floor Plan - After

After several back and forths this was unanimously declared the winning layout.  A new larger bathroom with double vanity, separate tub and walk-in shower and a separate laundry room which they agreed would be so much more practical and appropriate for the house than having it combined with the bathroom.  The window locations worked best for each room by flipping the laundry room and bathroom locations (and also means the laundry room no longer backs on to the baby's room).  But even in flipping the rooms the new layout was able to utilize a lot of the existing plumbing locations.  In addition to this layout I also created a budget for them based on the new plan which confirmed their initial budget just wasn’t going to be enough to achieve their goals. This was an enormous help in making sure they were properly prepared for the costs involved before moving ahead with the project or making any purchases. 

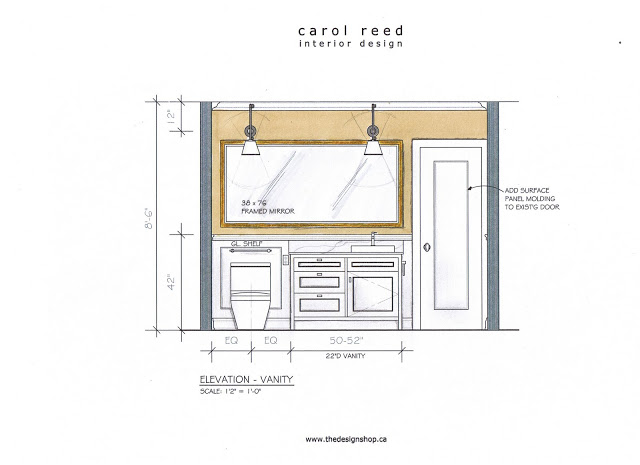
Vanity Elevation Options

I provided Janice with three different vanity wall mirror and lighting options. She had her own source for custom cabinets so I was able to design the vanity to fit the space.


Wall Panelling Elevation
The design plans included two different wall treatment options and Janice opted for this one which is a wainscot treatment created from panel moulding.  The elevations provide her with all the dimensions needed for installing the moulding (the moulding specs and sizes were included but have been omitted from this copy).

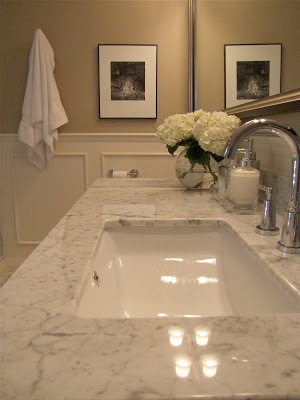
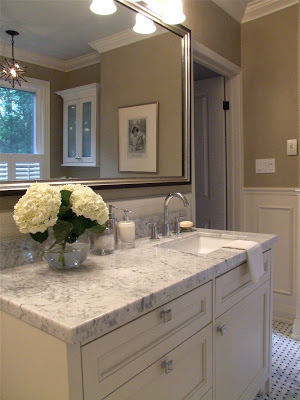
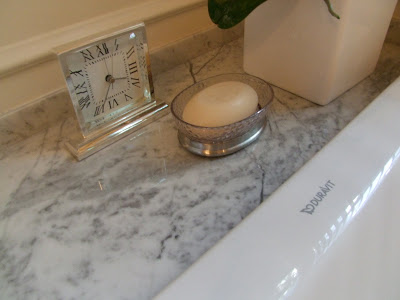
Janice and her husband are experienced DIY'ers who have completed many projects around their house which Janice blogs about on her popular blog Life Begins at Thirty Right?.  Due to the extensive nature of this reno she was nervous about making mistakes and wanted the reassurance of expert advice.  She does enjoy being hands-on thru the process, she's really savvy when it comes to sourcing products and co-ordinating a project so an E-Design solution was a perfect fit for her.  Within the package there are enough options presented that she still gets to have design input in the decision making. This project is from a couple of  years ago but Janice kept me updated along the way and last summer I had the opportunity to visit and take some 'after' photos of my own - which I'll share next week!!!  I was so impressed by what an amazing job they did turning these plans into reality the room literally blew me away when I saw it in person.  

The above drawings are just a portion of the e-design package I completed for Janice, she also received finish and fixture selections, a lighting plan, a source list, and a budget breakdown.  (note that specs have been removed from the drawings shown in this post).  You can check out more of Janice's bathroom project on theDesignshop website where you'll see some before pictures and some progress photos. 


All plans and drawings:  Carol Reed


After: E-Design Bathroom Project Part 2


One of the most exciting parts about E-Design projects is when I receive those long awaited 'after' photos from clients.  Handing a project off to someone else to takeover fills you with lots of anticipation (and anxiety!).  A couple of months ago I received one of those Christmas like emails from an e-design client who had just completed her newly renovated bathroom.  It was soo exciting to hear from her as I knew she had proceeded full-on with the renovations following my design plans so I couldn't wait to see the results.  To check out a few of her 'after' photos along with some of the before pics and my design plans for the space, you can go here.

When I saw the first after photos of the space, I was speechless,,,you really had to see the befores, this transformation was dramatic but the fact that she implemented the entire renovation so successfully from my E-Design plans was such a thrill for me.  She and her family had lived in the house for 25 years and had never taken on any renovations or upgrades,  until now they had only dreamed about them ...so she was brought to tears when she saw the finished bathroom for the first time.  Since the house was located in Toronto I couldn't resist the opportunity to visit in person and take some of my own photos, so a couple of weeks ago I arranged to meet this client face to face and see her home in person for the first time.  Camera and flowers in hand of course!


Its hard to describe what it felt like to walk into this space, because its like I had already been there - its surreal to see what had been a very vivid image in my head for so long, now right there in front of me, yet I hadn't been part of the physical transformation process.   I hadn't seen it evolve so this visit was a role reversal, it was the designer experiencing the 'reveal' not the homeowner.  The fact that someone else who I'd never met had so literally brought the vision that was in my head to reality was overwhelming.  And as corny as it sounds, the space itself,,,really was breathtaking, I actually gasped, the photos truly don't do it justice.  If I could only capture that 'feeling' on camera or find the words to convey it.....


The house is a heritage home so the goal was to give the space some classic traditional character but with a contemporary edge.  But it was most important that the space wasn't done in cool greys or blues or too white.  There were splurges, saves, and great buys. The floor was the definitely one of the splurges.  A basketweave mosaic marble, simply laid with no borders or inlays.  Classic and timeless.  I loved the varying shades of warm greys.


The old brick chimney wall was clad in drywall and surface applied panel moulding was added to create a wainscotting effect around the entire bathroom.  Simple crown moulding and baseboards complete the trimwork.


Another splurge, a custom designed vanity with plenty of deep drawers provides tons of room for each family member to conveniently stash all their products.  The sink was offset to maximize the counterspace.


The biggest objective for the redesign was to create a separate tub and shower.  It was intentional that all the plumbing fixtures have simple clean lines and be contemporary.  I think this works well in an otherwise traditional space and keeps it from looking dated.  You can see the plumbing fixtures have rectilinear lines.  One decision the homeowner made was opting for an undermount sink as opposed to a sink that had a 3" lip around it the same as the tub....but I think this option works just as well especially because of the shape.  I normally provide 2 options when making selections for a client and either one is meant to work equally well.


I think its important to point out that aside from the fresh hydrangeas on the vanity (its all I could find - why is there no selection of fresh flowers in June???) and the potted orchid on the tub deck (my gift),,,,this is exactly the way the bathroom looked when I arrived that day.  I was impressed how well her artwork fit in.


This moravian star fixture from Home Depot was a great 'save' and one of her favorite things in the bathroom.  You'll also notice in some of the shots the ceiling is painted a soft pale blue.  A beautiful detail that I often do in bathrooms.


One of the key finds was this sleek soaker tub by Duravit, and surpisingly it was a great buy too at less than $700.  Because the existing window was so low to the floor this tub with its low profile fit perfectly without having to make any alterations to the window.  Its clean lines are gorgeous looking and the homeowners all rave how comfortable it is, even the men!


The front of the tub was paneled with the same moulding detail as the walls and finished off with a simple shoemould at the bottom.  The marble tub deck and vanity counter were finished with a rectilinear profile to maintain that contemporary edge.


On the inside of the shower, on the back of the half wall is a built-in soap niche which contains all the products and keeps them out of view.  Hooks are a must in any bathroom that's used by men or children, they simply won't use towels bars!


When I design showerstalls I always specify solid slab thresholds and jambs.  One of the reasons I often use carrerra marble in bathrooms is because you can find ready-made marble jambs instock at any building centre in one of two materials, carrerra and jura beige.  If you go with one of these it means you save the expense and time of having to get jambs custom fabricated from some other material.  I prefer classic carrarra so I'll chose counters and tiles that will work with that.  Then, splurge on a frameless glass shower enclosure.


The rectangular lines continue in the shower fittings, and the classic white subway tile (another 'save') was installed with a light grey grout to add more character.  In general the minimal use of tile in the room is a big cost savings.  I love the sparkle of polished chrome fixtures, and they'll also cost you a lot less than polished nickel.


A luxurious rainshower head.


The rectangular shape is continued on the vanity drawer fronts and hardware.


This is the view standing in the doorway....


I hope you can see why I was so excited to share these after photos.  I'm thrilled that my client is happy, in fact she tells me "its the most beautiful bathroom I've ever been in" and its been such a joy to use.  How amazing is it that its had such a positive and uplifting effect on her and her family's everday living!  

Next she's going to tackle her 25 year old kitchen which she plans to overhaul next summer.  I'm about halfway thru the design planning for it and I can tell you its going to be as dramatic of a change as the bathroom was.....  

If you have a space that your planning on renovating but don't have any design plans, check out the E-Design services available on my e-design site thedesignshop where you can also see more of this bathroom redesign project in the Gallery.


All Photos:  Carol Reed

Before & After: E-Design Bathroom Project


I received a wonderful surprise in my inbox this week from a client who I had done some work for last September.  Much to my excitement, she had emailed me some 'After' photos!!   I love to see photo updates from my clients, but these particular photos were exceptionally exciting.   This time, this wasn't the usual full-service design project where I was involved from beginning to end, spending much of my time on site and seeing the progress along the way etc..,,,,,,in fact it was quite the opposite -  this client came to me thru my e-design website, thedesignshop.ca.  Which means I've never met this client in person or ever stepped foot in her house, although I feel like I have.   So I was beyond thrilled to see this bathroom transformation thru the photos she sent me. (wait til you see the 'befores'!!)

thedesignshop.ca is a website I launched a little less than one year ago - its an affordable and accessible way to receive a comprehensive design plan, prepared by a professional Interior Designer then delivered right to your in-box.  The entire process takes about 3 - 4 weeks and is suitable for those who live outside the Toronto area and/or those seeking design advice but are willing to do some of leg work themselves.  In this case, the homeowner ordered a Bathroom Redesign for the main bathroom in her victorian rowhouse located in a historical neighborhood in Toronto.  When she ordered the e-design service, she emailed me a site measure of her bathroom, photos, and all of her requirements.  In return I asked her to complete detailed surveys relating to the house, her lifestyle, and her preferences and then she sent them all back to me along with a few inspiration photos of bathrooms or elements that she was drawn to.  With all that information in hand,,,,,I was able to re-design her bathroom and deliver a comprehensive design plan to her complete with all the relevant information she would need to purchase all the products and hire a contractor to build her new bathroom.   After sending her the completed e-design package last fall, I knew I had hit the target when she replied telling me how happy she was "when i opened up the attachment and immediately saw the moravian star fixture I knew you had captured my idea of a dream bathroom".  Soon afterwards she sent me an update saying she had hired a contractor and they were looking forward to starting the reno in January.  Aside from one question about the size of the vanity drawers (her contractor thought they would be too big?) I havn't heard from her again...............until this week.  And - its all done!

But before I show you the after's,,,,you really need to see the before's to appreciate what a dramatic transformation this was.


The Before's......

Sink Vanity with hollywood lights


Tub/Shower enclosure with cedar clad walls


Wall to the left of the window with brick chimney wall and cedar cladding

The last time the bathroom was 'done' was in the early 80's, and with all that cedar cladding and the hollywood lights, the homeowner described this style as 'Sauna Chic'.  It was the main bathroom in the house for her and her husband and two adult sons, their only other bathroom was a 2pc in the basement.   The great features about the room were that it had good high ceilings and a wonderful big window with  a gorgeous view of a leafy backyard garden.  


The Inspiration.....

A collection of images that illustrate various elements and design details to be used as reference for the new bathroom design.


 She loved the charming timeless character and warm colours of this traditional bathroom.  I proposed either a panel moulding wainscott detail or a painted beadboard wainscott which would work equally as well.


She loved the understated and simple lines of this classically inspired bathroom with its contemporary styled plumbing fixtures and furniture style vanity. Also high on her wish list were clean lined vessel sinks and single lever faucets.


She loved all the traditional details here but wanted something warmer in colour for the walls. 


The Design Plans....
First I emailed her two preliminary layout options for incorporating a separate tub and shower which was the main objective, but the toilet and vanity locations remained the same.  She decided to go with a drop-in style tub with a tub deck and skirted front.  So the rest of the design plans were developed from there.


The final floor plan.


This is the Elevation at the window wall showing the new tub surround and seperate shower.  The tub selection was key as we needed to find one that was low enough to be installed under the existing window and one that had simple clean lines.  This new model from Duravit fit the bill perfectly!


This side elevation shows the half wall with glass between the tub and shower.  The paneled wainscotting and crown moulding added that traditional character to the room.


I had provided her with 3 options for the vanity wall, one option had a smaller mirror over a centre sink with scones on either side and a storage cabinet over the toilet, she had a hard time deciding as she really liked both, but in the end, she opted for this option with the large mirror and lighting above. 

In addition to all the drawings above, I also provided her with a list and photos of all recommended plumbing fixtures, light fixtures, hardware, mouldings, tile, window treatments and accessory selections along with sources and approximate costs.  You can see more images of this e-design package on thedesignshop.ca website sample gallery here.


The After's.....

The email I received from my client this week along with the 'after' photos was quite a surprise.  I received a short note from her along with some photos.  It was eloquent, and precise just like I imagine she is. "my bathroom has been complete for two weeks and I must say its the most beautiful bathroom I've ever seen. When the mirror was put up I had tears in my eyes..."


I proposed both a vessel style sink option and an undercounter mount,,,,,along with two faucet options of either a single lever or widespread.  I was surprised to see she didn't go with the vessel style sink, but I think this looks great too!


I also provided several ligh fixture options.  Often this decision is determined by what's available for when you need it, especially when you need two of them.  You can see on the design board (2nd photo from top) that not everything illustrated there is seen in the after photos, however, the final choices made were from alternate options provided in the design package, so there is always flexibility of choice offered to the client.


Well what can I say but - so beautiful!  Even without any professional styling or photography, the bathroom looks stunning.  These photos were taken just the other day and the bathroom has only been complete for 2 weeks so I imagine she'll be adding a few more accessories or artwork in the future.  I can't begin to describe how impressed I am with the results and congratulate her on doing such a stellar job!!   To realize what this homeowner accomplished - implementing this project on her own with a set of plans and written instructions is inspiring.  I think these images speak volumes to the importance and value of investing in a good design plan, but then again, this client is an Academic by profession so she was wise enough to recognize that! ; )

Since this house is located in Toronto, I'm making plans to visit in person before the end of next month so I can take some of my own after photos.  I'm looking forward to meeting this client in person and she's looking foward to relaxing for a bit, pampering herself in her new bathroom and getting ready to start her next e-design renovation project......the kitchen!