Kitchen Renovation: 18th Century Dutch Colonial

Design Plans & Concept for the kitchen renovation of a heritage home on the South Shore of Nova Scotia.

Kitchen Concept by: Carol Reed Interior Design Inc. www.carolreeddesign.com

Kitchen Concept by: Carol Reed Interior Design Inc. www.carolreeddesign.com

Without a doubt one of the most appealing aspects of designing projects in Nova Scotia is the opportunity to work on some of the oldest homes in the Country.  Its exciting not just to see this heritage preserved but seeing it adapted and juxtaposed with modern day living.  This rural, oceanside dutch colonial dates back to 1784 and has maintained all of its original character and features for more than two centuries, its significance holds heritage designation.   Nestled on a grassy treed lot, it sits prominently at the end of a large harbour with stunning views of the ever changing ocean and sky.

CREED Blog - Dutch Colonial Kitchen Renovation, Shelburne Nova Scotia www.carolreeddesign.com

CREED Blog - Dutch Colonial Kitchen Renovation, Shelburne Nova Scotia www.carolreeddesign.com

The scope of this project involves renovating the current kitchen and adjacent pantry.   The original 18th century kitchen was in the cellar and has likely been out of use for the past century or more.  The current 'modern day' kitchen is on the main floor at the rear of the house but consists of nothing more than a double sided island in the middle of the room (the sink on one side, the range on the other) and two closets.  Not surprising the top priority for the new owner of the house was to put in a new kitchen.   

The room is a large rectangle with some common but difficult challenges to work around; a wall of windows with low sills, 3 doorways, and a brick chimney stack - not a lot of wall space to work with.   With a concept for the design already envisioned, the next step was coming up with the new layout.  

Rear view, the door on the left leads directly into the kitchen.CREED Blog - Dutch Colonial Kitchen Renovation www.carolreeddesign.com

Rear view, the door on the left leads directly into the kitchen.

CREED Blog - Dutch Colonial Kitchen Renovation www.carolreeddesign.com

Kitchen Design by: Carol Reed Interior Design Inc.www.carolreeddesign.com

Kitchen Design by: Carol Reed Interior Design Inc.

www.carolreeddesign.com

The initial proposed plan (above) involved removing a brick chimney that imposed approximately 2 feet into the room (previously serving an old fireplace) and is located exactly where we wanted to put the new range.  After much deliberation however, the final version of the plan (not shown) now incorporates the chimney stack staying as is, so the range wall has been reconfigured from what you see above but maintains the same design concept.  More importantly, the homeowner is equally as thrilled (as am I) with how the alternate solution worked out.  In addition to the main kitchen the adjacent separate panty/servery will be maintained but with all new cabinetry and finishes - the only mandate being a recently purchased fridge had to stay.  The panty is situated between the kitchen and dining room, with an entrance into each. 

Kitchen Concept by: Carol Reed Interior Design Inc.www.carolreeddesign.com

Kitchen Concept by: Carol Reed Interior Design Inc.

www.carolreeddesign.com

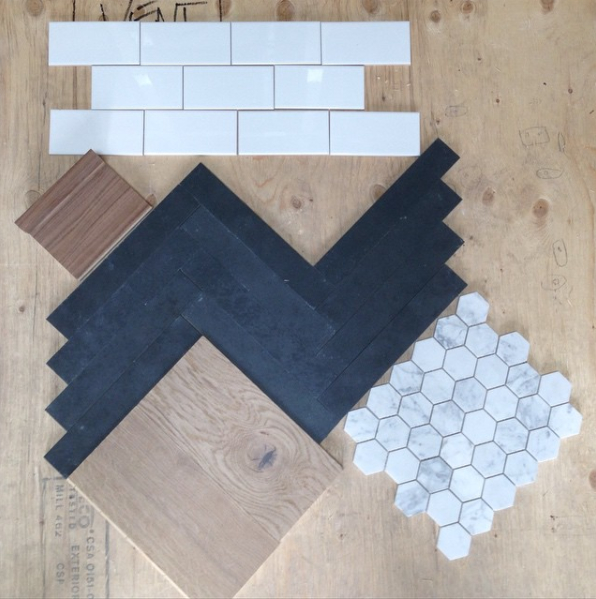
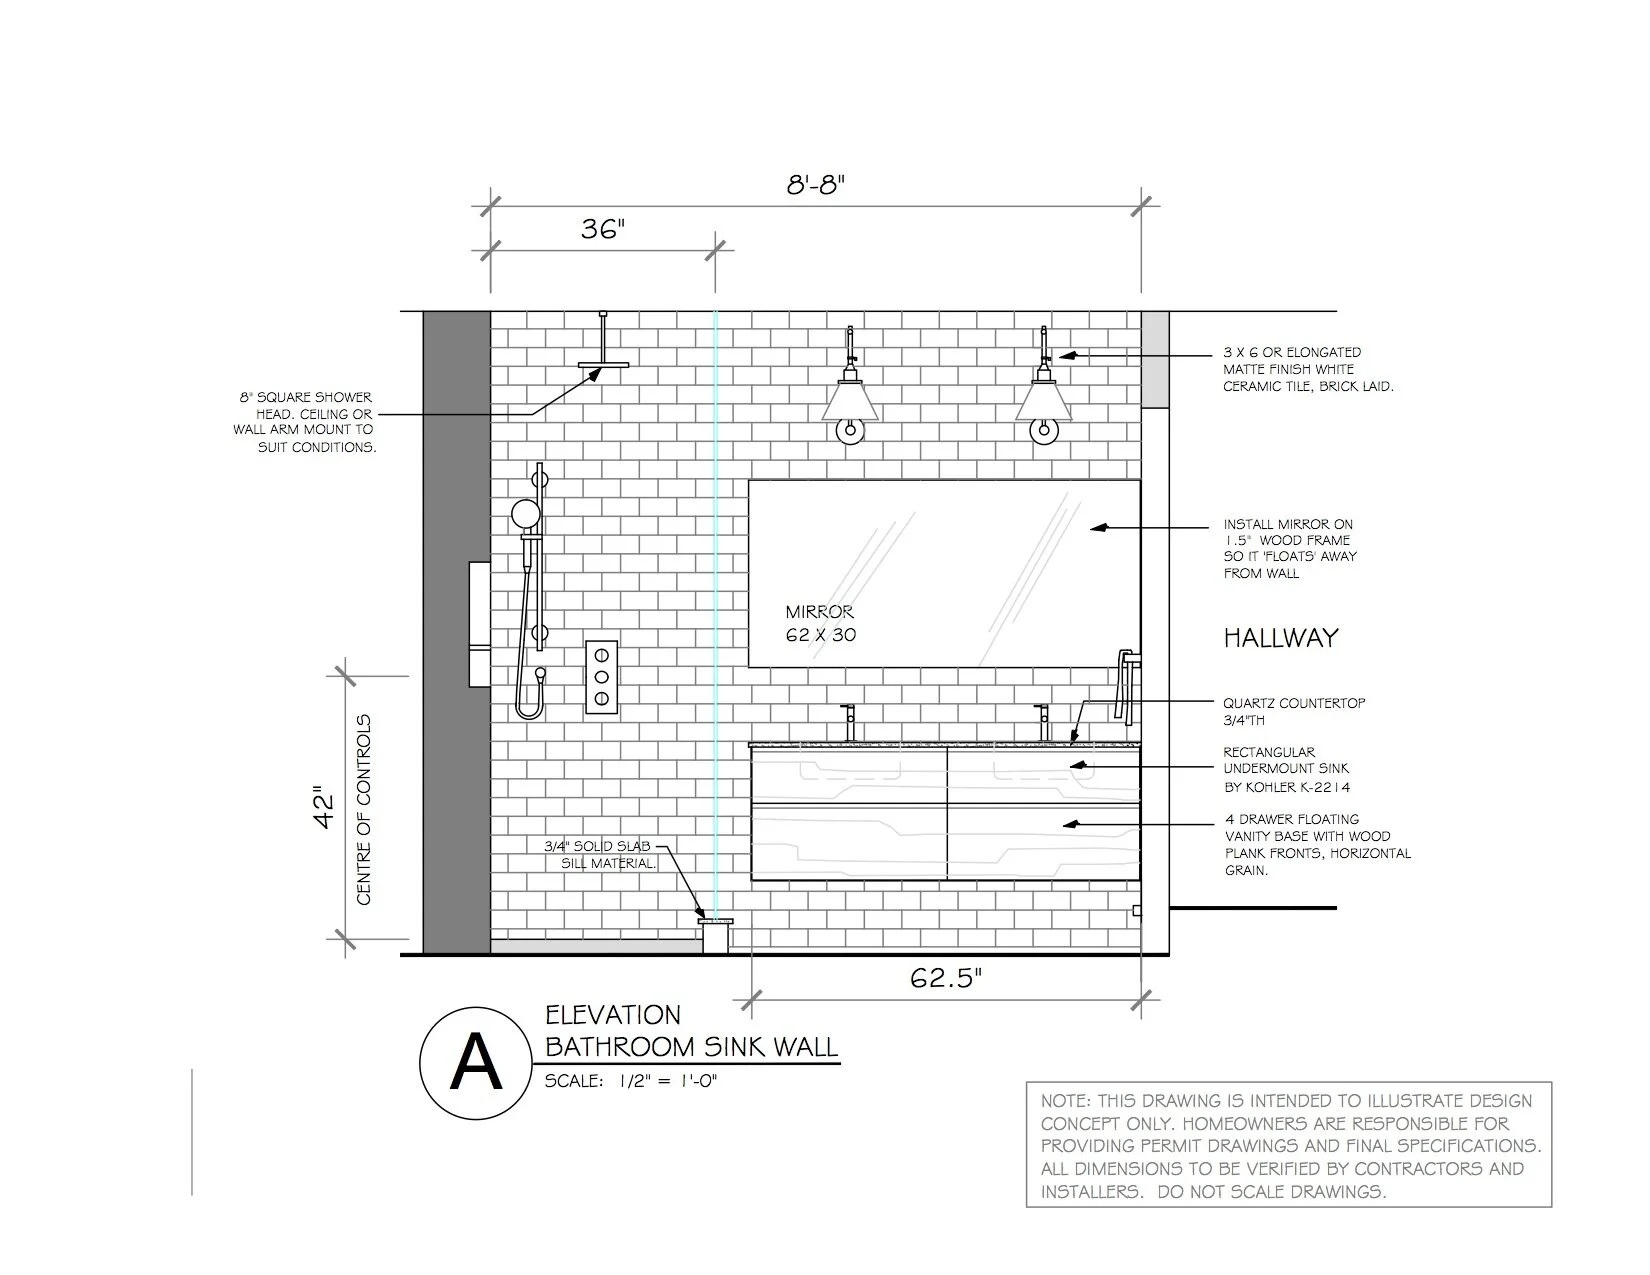
The concept for the finishes and fixtures for the main kitchen area (above) reflects the simplicity of the aesthetic - the new kitchen will be very plain, and very english with hand crafted quality.   The floors will be the original wood floor boards, we'll be exposing the original hand hewn wood ceiling beams, the cabinetry will be custom made, flush inset with a hand painted finish.  The existing original large mouldings will be replicated in new.  The sconces and stools are a nod to the colonial style of the house.  The range wall features a large hearth style range canopy complete with mantle which also does a stellar job of concealing the old brick chimney.  

Finishes & Fixtures Presentation Meeting - December 2017.Kitchen Concept by:  Carol Reed Interior Design Inc.   www.carolreeddesign.com

Finishes & Fixtures Presentation Meeting - December 2017.

Kitchen Concept by: Carol Reed Interior Design Inc. www.carolreeddesign.com

Demolition started this week and I'm looking forward to seeing what's discovered when the bare bones of this 18th century charmer are revealed. 

Fresh New Look

www.carolreedinteriordesign.comFull Service Interior Design  |   On-line Design

www.carolreedinteriordesign.com

Full Service Interior Design | On-line Design

I'm thrilled to announce we launched a brand new version of the website last week which has been in the works for some time.   Next we'll be focusing on uploading more new content which will include recent project work and projects in progress.  One of the changes to the site included moving all of my past Blog content from Blogger over to the website, and miraculously that happened without a glitch.  The old content still exists at  carolreeddesign.blogspot.ca but any new posts will happen here.   

With this move comes a new blog format that I'm not fully familiar with yet but I'm hoping this will be a simpler blogging platform and one that easily integrates with other social media.  I haven't figured out how to get the side-bar information I'd like to see with the blog, like search tool etc., but its a work in progress.   I'll also be linking past projects seen in the Projects section of the website to their related blog posts.

So, welcome to the new CRID website and the new CREED blog space!!  I'm excited to have them living happily together under the same roof where I"m hopeful they will both receive more frequent visits and updates.  

E-Design Bathroom: From Concept to Sneak Peek

CarolReedDesign-LM-Ensuite-EDesignConcept.jpg

E-Design Bathroom Concept

Lindsay contacted me through my e-design website

rearding their 3rd floor master suite, located in a century home in the beaches neighbourhood of Toronto, it was a large full floor bedroom with sitting area.  Her goal was to turn the sitting area into a new master ensuite.  The wish list included; double vanity, freestanding tub, walk-in glass enclosed shower, a separate water closet and….create space for a walk-in closet in the planning of the new ensuite.

Before Plan - Master Suite

The before plan was a wide open space divided by a staircase and there was a low sloping dormer ceiling in the soon to be new ensuite area.   The staircase had a half wall on one side and a frameless glass guard railing on the other.  Spaces with sloped ceilings are always a challenge for most people to visualize because the plan view is deceiving, there appears to be lots of floor space but in reality the useable floor space is much less. Wherever the sloped ceiling dips below 5or 6', its not considered *useable* floor space because there isn't standing room, its not completely useless space but its not useable for anything that requires standing up, like showering or using a sink or using a toilet.  In a bathroom with sloped ceilings the layout and placement of fixtures is largely dictated by these slopes - the plumbing fixtures all need to be located where there is full ceiling height or at least standing height clearance.  

The initial space plans quickly determined it wasn't feasible to fit everything in this space that Lindsay had hoped.  The top of the staircase landing is only 24" wide so accessing the ensuite from the landing side of the staircase was out of the question - this meant the only access for both the walk-in closet

and

ensuite would have to be on the far side of the stairs.  I 

could 

get everything including a walk-in closet in the floor plan but ultimately Lindsay decided she didn't want to walk-thru the closet to get to the bathroom.  So we'd need to give up either the walk-in closet or separate water closet....  

Layout option A reflects this compromise and came really close to ticking all the boxes.  The bathroom was spacious with the luxury of a separate tub centred in a dormer window and... a water closet.  While there is no walk-in closet the proposed wardrobes offered more space than the existing closets, but would require losing the long glass railing in order to fit a wardrobe wall.  I envisioned the wardrobes creating a beautiful wood veneer "wall"  backing onto the stairwell, stopping short of the ceiling to let light flow thru and also keeping the glass guard on the one end again to let light into the stairwell, possibly with mirror doors on the wardrobes too.  The glass guard rail though was not something Lindsay wanted to give up.  I would chose closet space or at least a half wall with drawer storage versus keeping a glass guard rail because storage is so very important and keeps your space/life organized.  However, I do understand how important it was for them to keep the glass, we moved on to explore more options and ended up at this final plan….

The ensuite was made a bit smaller to accommodate the closet location and thus the final plan doesn't have a water closet or walk-in closets but they were compromises Lindsay and her husband were happy with.  The closet space was great (deeper than the old closets) and the new ensuite was still spacious and bright with a large window, a new skylite,  interesting sloping ceiling and some built-in shelving. 

CarolReedDesign-LM-Ensuite-EDesignConcept.jpg

The concept board illustrates the fixture and finishes I recommended based on Lindsay's style survey and her desire for modern elements, white marble and rustic warm wood, in addition to these choices I also provided alternate options for each selection.  The vanity would be custom made and the inspiration photo is an example of the style and wood finish (character grade walnut planks). Here's an excerpt from her design summary of how I described the concept:

"

overall I took a contemporary approach using classic details and materials to create a timeless mix of modern and organic elements.

The high contrast of the ‘black’ metal finish with white also gives it an attractive graphic punch that feels modern and vintage at the same time."

"There is a great mix of materials; natural wood, natural stone, glass, and ceramic, as well an interesting mix of textures (both shiny and matte) and metals, paired with various levels of lighting all very thoughtfully applied to give the space great interest and depth. "

The tile options I provided worked with both her style preference and budget.  An elongated white subway tile on the walls, a white marble mosaic on the shower floor and a large format marble tile on the main floor as described in the written summary:

"...the large square in particular can give the effect of slabs especially if tight joints are maintained." 

As an alternate to the marble floor tile I also proposed a narrow rectangular black slate as I described in a written summary:

"This can be a very modern look paired with lots of white on the walls and natural wood, however, I do find that although its modern the dark on the floor is ‘heavy’ looking and a tad more rustic looking. 

To make it a little more elegant in feel, I’m suggesting a plank shape which you can lay in a herringbone pattern."

The concept for the cabinetry and built-ins, I proposed either a rustic walnut veneer that included the character of the knots, or a knotty european white oak. 

Here's the actual finishes that were chosen pictured here in an instagram photo, Lindsay ended up doing the europoean white oak for the flooring throughout the bedroom.  I believe the hexagon was intended for the shower floor (as per the design plans) but I think in the end it was either omitted or used only in the soap niche.  Can you tell how detail oriented and organized Lindsay is! I love that she has her materials mocked up so you can really see how the proportion of the tile sizes and patterns work with each other and how each material offers a different texture.

CarolReedDesign-LM-Ensuite-EDesign-Elevation A1.jpg

The floating walnut vanity would be custom made per the design elevations.  I provided a selection for a countertop mounted faucet or wall mounted (budget decision!), and a single long mirror would be floated off the wall, like so…..

"Have the float frame part of the mirror made from the same wood as the vanity or paint out in white to match the wall tile."

CarolReedDesign-LM-Ensuite-Progress-1.png

E-Design - In progress, custom floating walnut vanity.

I'm thrilled to see how this installation came together, and especially the decision to go with the wall mounted faucets, absolutely love it!

CarolReedDesign-LM-Ensuite-EDesign-Elevation B.jpg

This option of the shower wall showed the wall tile continuing across the entire wall behind the toilet with a recessed soap niche in the shower and recessed wood shelves under the eaves and a wood shelf ledge above the toilet.  I provided another option of this same elevation with the wall tile stopping just past the shower glass which is in fact the way it was installed.

CarolReedDesign-LM-Ensuite-EDesign-Progress-2jpg

E-Design - The After, view of shower wall

In this instagram image you can see a sneak peek of the finished space with a glimpse of the herringbone floor, recessed wall shelving beside the toilet and the floating walnut vanity. It looks like they opted to forgo a shower threshold which also means they continued the black slate tile into the shower.  My one concern with this decision is that the dark tile could really show soap residue on the surface and in the grout so hopefully that doesn't prove to be an annoyance.

The oval freestanding soaker tub takes prominence centred in front of the large dormer windows and tucked under the dormer roof.  A simple roller shade that operates bottom up will provide privacy and daylight.

E-Design - After, soaker tub

I'm absolutely thrilled to see the progress of this bathroom renovation and how well the e-design plans were implemented.  With each e-design package there is always room (options) for clients to make decisions on their own and make personal choices and I love seeing which choices Lindsay ended up making and how beautifully its come together.

If you're interesting in E-design plans for your own bathroom or kitchen reno please visit my E-Design website

www.thedesignshop.ca

for details.  

All design drawings/plans:  Carol Reed Interior Design Inc.

Room and sample photos:  via Instagram