207 Logan Ave.

Victorian Row House: A Designer Reno on A DIY Budget - Part 5


The Living and Dining Rm - Before & After

*Edit February 2015*
I've recently learned this former house of mine is currently for sale on MLS and also has been popping up on some other Toronto websites with links back to my blog posts here, citing that this is still my house and that i still live there.  Just to clarify - I no longer own or live in this house, I sold this house in December 2008.  I want to also mention that because of my blog posts here about my house renovation, that two years after selling it the new owners, (he was fresh out of law school) filed a claim against myself and the Home Inspector for mis-representing the property (after an earlier failed attempt at trying to get money from each of the Broker firms ).   After moving in to their very first home the young new lawyer and his  new wife were not happy with the lack of sound privacy the row house offerred and claimed the real estate listing failed to disclose what the sound levels were. (??).     To make  a two year long small claims court story short,,,,,in a settlement hearing a Judge basically said they didn't have a chance, not a chance of winning any type of settlement in court over this,  it wasn't a new build, it was a 100yr old+  row house and their expectations about what they were entitled to were completely unrealistic.  Caveat emptor.  It took two years of lawyers time to settle that.
*end of edit*


I should start this post by stating that we began this renovation in the spring and as September rolled around I was feeling more and more uneasy about the possibility of moving out of my rental and into this newly renovated home. With the stock market crash and the collapse of major wall street firms, I was left feeling really uncertain and confused about holding on to this piece of real estate. Knowing that if I moved in it was going to be short term anyways, we decided it would be best to sell after completing the renovation, but we would need to do it sooner rather than later. Sooooo,,,, with the plan now to sell,,,,we debated whether to furnish the house or not. And the vote was yes. We spent 2 days moving furniture in from my own home and purchasing some small items to fill in the holes. I was happy with the end result as it was certainly a step above the average 'staged' home,,,,yet, it doesn't reflect how I would have loved to have furnished the home had I planned on living there.


Now here's a few of the before's a bit about some of the material's and details we used.

Before - View of Living Room and Front Entry before closing.


After - View of Living room after new windows, smooth ceilings, floor, trim and paint was completed.


The most compliments we received on the finished house was the new floors.   Everyone who walked thru the door, from installers, to friends, to neighbours to the pizza delivery guy,,,,,all commented on how much they loved the floors and wanted to know what they were, where to get them.  Personally, I loved the floors too and I had them selected from day 1.  They're a natural finish, solid 3/4"th x 3-1/4"w prefinished birch in a loft grade.  And they also happen to be the least expensive floors I've ever specified at $1.99 s.f., in stock and on sale!  They're from an Ontario based company called Kultur Flooring who claim to have the most advanced wood flooring mill in North America.  One of the things I really like about their product is they are the first mill in North America to mill the whole tree for wood flooring - this allows them to offer a range of wood grades and produce really long boards.   Also, for a prefinished floor they have the smallest micro-bevel edge I've seen, giving it more of a site-finished look.

I chose the loft grade because of the character - the variation of colour and the visible knots which reminded me of some of the antique floors I've installed (for a LOT more money), and I think they created a loft like look in the space.  They came prefinished in a clear, matt finish.  I prefer my wood floors to be natural, not stained, and I like them to be very low sheen like a waxed finish and this floor offerred both of those.  This gives them a more relaxed look and is more forgiving to scratches and wear and tear.  I think the older they get, the more character they'll develop.  What sets them off even more is the all white walls and the black window frames, again creating a contemporary urban soft-loft like look.


Before - View of Dining room before closing.


Before - Living and Dining room after demolition.  Newly smoothed ceilings and partial primed walls and railing.


Before - Living and Dining Room just prior to new floors being installed.

We installed new casings on all the windows and doors and decided to custom cut our own.   I was looking for a simple profile, something very clean lined and contemporary looking but there's not much available in stock.  So I purchased 1" x 4" select pine and had my handyman run all the boards thru his table saw to create a wide bevelled top edge.  Once the saw was set up the process went pretty quickly and the cost was a lot less than factory milled casings.  After they were cut, a once over with a palm sander and a primer coat to seal the knots, they were ready for paint.  So we ended up with custom casings for about $1.09 linear foot.  The biggesst challenge was trying to find a store that had enough lumber in stock!

Before - the first new baseboard being installed on the new hardwood floors.  Don't worry,,,1 hour later a super powerful pneumatic nail gun made an appearance.

The second most common compliment we received on the house was on the baseboards. Who would've thought something as boring as baseboards would be so appealing to people.  I assume, like myself,,,many people have tried to find simple contemporary style baseboards with no luck and maybe that's why they were so taken with the ones we installed here.   I selected stock boards again, this time a 1" x 6" primed mdf.  These boards were installed everywhere as baseboard and I love the clean simple lines they create.  The best part is its a really inexpensive solution, (about .78cents l.f.) readily available, pre-primed and with no fancy profile, its fairly simple to install because there's no coping required.  This made my handyman, Six, very happy (or was it just the power nailer).


After - View of living room and dining room new windows, ceilings, floors, trim and paint were completed. 


I think painting out the old hand rail and spindles made a huge transformation to the staircase, no more 80's golden oak.  We cut-off the little curly-que end portion of the old handrail and added a large newel post which i think is more in keeping with the original character of the century house.  The hand rail was painted a glossy black but I also think it would have looked just as good with the spindles painted black as well.

The light fixture in the dining room was a great find at Habitat for Humanity, I'd seen it regularly at lighting showrooms selling for $600, I scooped it up for only $125, brand new in the box.  The living room had this oddly placed junction box in the ceiling directly in front of the window, what normally might instead be centred in the middle of the room.  I decided to hang a small, modern looking pendant chandelier there suspended over the sofa, with the 9' ceilings it added some sparkle, made the window area look more special but also created a nice visual from the exterior of the house.  A bit unexpected but I think it worked really well.


After - the Living Room


Stay tuned for the next post on this Victorian Row House reno where I'll post photos and details about the kitchen and family room!


For earlier posts:


All Photos:  Carol Reed


Victorian Row House: A Designer Reno on A DIY Budget - Part 4


The Second Floor - Before & After

*Edit February 2015*
I've recently learned this former house of mine is currently for sale on MLS and also has been popping up on some other Toronto websites with links back to my blog posts here, citing that this is still my house and that i still live there.  Just to clarify - I no longer own or live in this house, I sold this house in December 2008.  I want to also mention that because of my blog posts here about my house renovation, that two years after selling it the new owners, (he was fresh out of law school) filed a claim against myself and the Home Inspector for mis-representing the property (after an earlier failed attempt at trying to get money from each of the Broker firms ).   After moving in to their very first home the young new lawyer and his  new wife were not happy with the lack of sound privacy the row house offerred and claimed the real estate listing failed to disclose what the sound levels were. (??).     To make  a two year long small claims court story short,,,,,in a settlement hearing a Judge basically said they didn't have a chance, not a chance of winning any type of settlement in court over this,  it wasn't a new build, it was a 100yr old+  row house and their expectations about what they were entitled to were completely unrealistic.  Caveat emptor.  It took two years of lawyers time to settle that.
*end of edit*


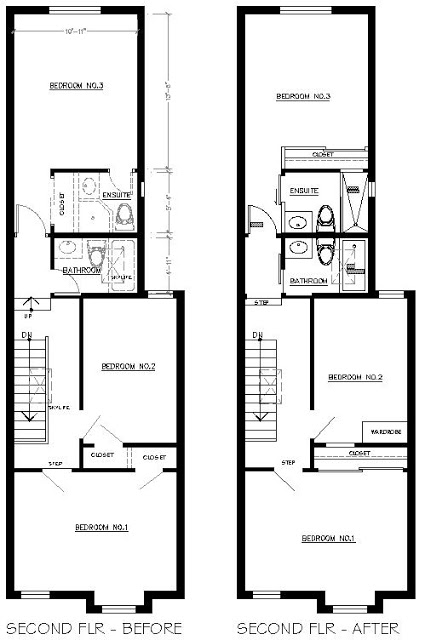
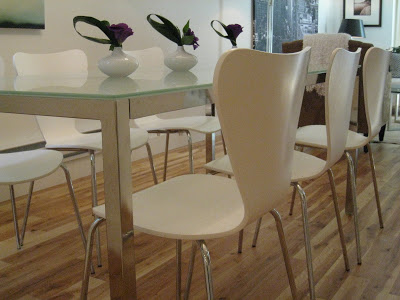
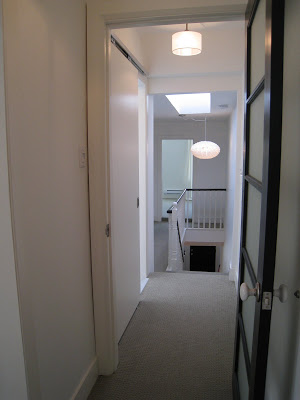
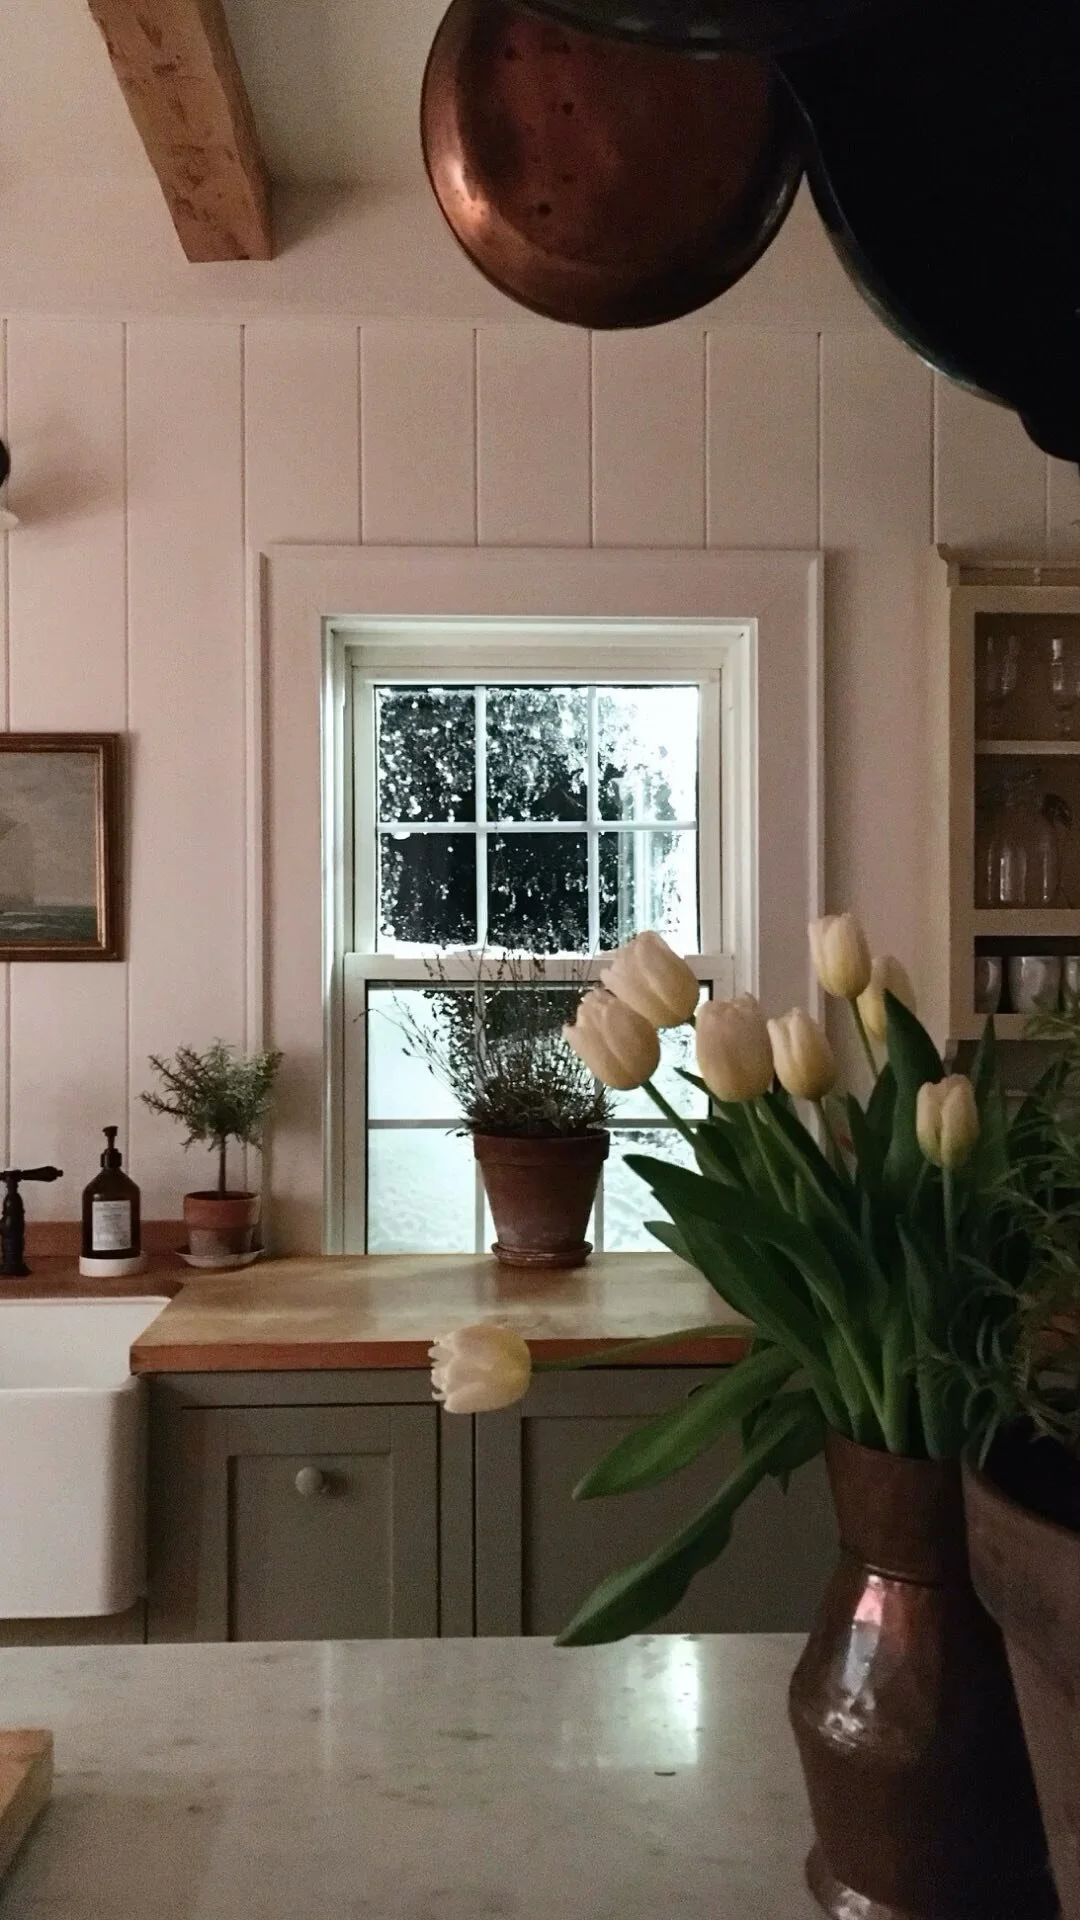
One of the best features about this house was that it had 3 bedrooms plus 2 bathrooms on the second floor, with one of those being an ensuite bathroom.  For a house of this size in the city, this is a rare and valuable feature.  The second floor was split level with the main bath and back bedroom/ensuite elevated up another 2 steps from the main hallway.  The modifications for the second floor included enlarging the existing tiny ensuite bath and creating larger closets.  What you can't see on the proposed plan view was that I also added a small linen closet beside the 2 stairs leading to the back bedroom.  Linen closets are also rare in these century old city homes.  The one we added was small but made great use of the bit of dead space at the top of the stairs.  The finished closet measured about 15"deep and was perfect for towels, sheeting and toiletries.  I can't find any photos that show it except for the photo at the top of this post, you can see it on the right hand side, thru the railings!

The original plan was to install hardwood throughout the second floor hallway and middle bedroom, but we discovered the subfloor and the upper stairs would have required extensive repair work in order to properly install hardwood so I chose to go with carpet to keep us on schedule and on budget.  I selected a warm neutral grey broadloom that had a high recycled content and went the highest grade of underpad for maximum wear and comfort.

I had to source and select a lot of light fixtures for the interior of the house, over 17 in total.  Each of the bedrooms had ceiling fixtures as well as the dining room and family room and then there were hallways and bathrooms.  I had a very small budget for light fixtures, with the need for so many, it adds up quickly.  But lighting is one area where you don't have to spend a lot of money to get a lot of style.  Most of the ceiling fixtures I purchase were $120ea or less, and all wall mounted fixtures were less than $55 ea.  So with a combination of great finds and one or two splurges, I think lighting is an easy way to add a lot of style and character to a house.


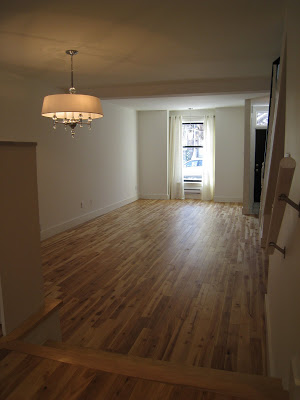
After - View of hallway looking towards the front bedroom and middle bedroom (on left).

I selected this contemporary pendant fixture, from Morba for over the staircase for a couple of reasons.  It was ovesized and dramatic, it was fairly inexpensive and what I loved most was the patterned shadows it cast all over the tall stairwell wall at night time.  At the end of the hall,,was the front bedroom......


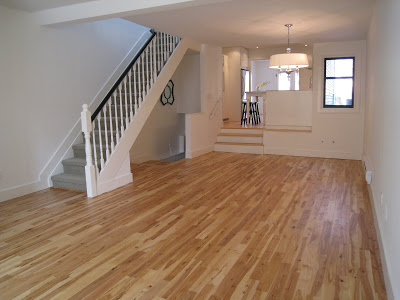
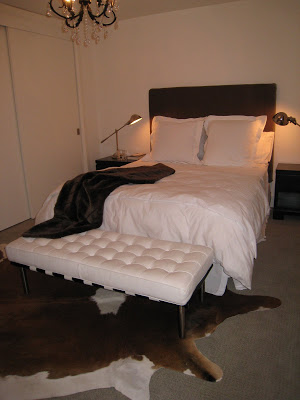
After - Photo of the front bedroom


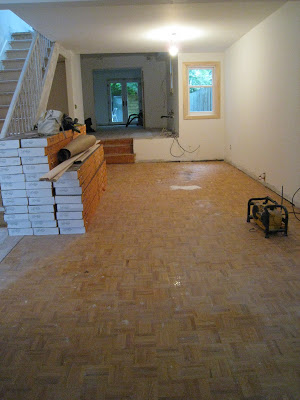
Before - Photo of Front bedroom after demo and primer.

While the after photo may not look like such a dramatic change, this room really underwent a total transformation. We skimmed the ceilings smooth, replaced all the carpeting, baseboard, trim, doors, and installed new double hung windows and full double width sliding closet doors. I loved the fact the room had two tall windows framing a view of the huge tree out front of the house. I wish I had captured photos of this view when the tree was in full bloom with its enormous pink flowers - it was really spectacular and smelled heavenly......


This is my brother Six and another brother, we call him Two, installing the new closet doors.

I felt it was important that both the front and back bedrooms have large closets, in proportion to their room sizes and in this room I was able to doube the size of the closet by eliminating the small closet in the middle bedroom.  I didn't want swing doors on the closet because they would impede the placement of night tables on either side of the bed, so sliding bypass doors were the answer.  I'm not a fan of mirrored sliding doors, or those sliding door kits made up of thin panels, instead I prefer to use a sliding door track system by K.N. Crowder.  With these track systems you can mount various size doors of your choice as they can ccommodate different thicknesses and weights, the tracks can be either ceiling or wall mounted and are really simple to install.  What I really like about these systems is that you don't have to have those unsightly tracks installed in the floor and even with really heavy or really tall doors, these track and hanger systems make the doors glide effortlessly across the track at the touch of a finger.  Once you install the doors on the hangers, you can easily level them by a simple adjustment and you can install floor guides at two points in the floor to keep the doors in position.  Of course the other reason I use these tracks all the time is because they're reasonably priced, this track and hangers was about $100.  I buy standard size (or special order a size) plain, hollow-core slab doors from Home Depot and then add a painted mdf valance to conceal the track.  (If you want a wood look you can order slab doors in an unfinished wood veneer too.) For a modern or more industrial look,,,,,I often leave the track exposed, or you can order the aluminum valance from Crowder.  Check out this website for specs K.N. Crowder sliding track hardware, I purchase this product from Upper Canada Specialty Hardware in Toronto but you can purchase this from practically any retailer who sells door hardware products.


After - View of the front bedroom showing the finished closet doors.


After - Front Bedroom view part-way during the furnishing phase, window coverings and mirror yet to be installed.


After - View of Front Bedroom empty of furnishings.  I installed a vintage looking black and crystal chandelier - that was a great find at Canadian Tire.  Another vintage touch was the white ceramic knobs on the contemprory black glass doors, I chose these instead of going with a contemporary lever style, and I loved the look.


After - View of Middle bedroom.

I chose to eliminate the existing small closet in the middle bedroom to gain a large double closet in the front bedroom.  I decided that an armoire or a wardrobe unit would be sufficient and provide equal or more storage than the old closet without sacrificing much space.   It was a small room and would ideally be suitable for a home office, a guest bedroom or a child's room, in any case, not a room that justified the need for a large closet.  I installed this contemporary chrome and chrystal chandelier which was a great find at Home Depot, again i think its suitable for a home office or nursery.....


Before - View of the upper hallway looking toward the back of the house.  Stippled ceilings, intense gold paint, stained carpet and lots of 80's golden oak.

Before - View of hallway facing front bedroom, after demo.  Ceilings skimmed and primer applied on walls and railing.


Before - View of upper hallway from back bedroom looking toward front of the house.  Main bathroom door is seen on the left.

After - View of upper hallway from inside back bedroom looking towards front of house.

I used the same sliding door track system for the back bedroom closet and both bathroom doors too. You can see in the above photo the sliding door of the main bathroom on the left hand side. In this case it was wall mounted and we left the aluminum track exposed (no valance). Sliding doors are something I use often on small bathrooms, while it doesn't add any s.f. to the space, it does eliminate the space taken up by the door swing and frees up more wall space, and does visually expand the room.


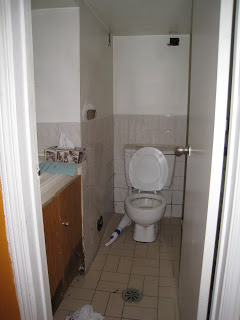
After - View of the main bathroom, Toto Acquia toilet, ming green marble mosaic floor.

Working with a small budget, I wanted to keep the bathroom clean lined and timeless.  I splurged on a ming green marble mosiac floor.  For a contemporary look, I prefer the impact of using just one mosaic without a border or mixing it with other tiles.  Here it added texture, colour and a feeling of quality because it was solid marble.  Because the s.f. was small, it was an affordable splurge.  I saved by pairing the mosaic floor tiles with simple white subway tiles on the wall.  The tub is one of my favorites, its a great buy for a contemporary looking soaker tub with its simple rectangular profile, this one is made by Crane and is available at Tubs for less than $500, which is at least $200 less than similar tubs by other mfg's.  We added a flat panel detail to the front for a classic look.  And with a budget so small, installing hooks instead of a towel bar is a substantial savings, besides, kids and men don't use towel bars so hooks are much more practical.  In the shower I opted for a just a handheld shower head on a bracket, this is great for bathing kids and for cleaning - and its a less expensive than installing a fixed shower head and a hand held.

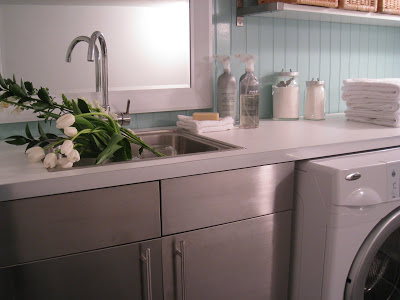
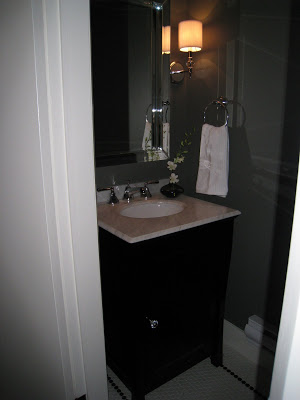
Afer - Ikea customized vanity with Caesarstone counter.

We maximized the storage in this small bathroom by installing a vanity that has 2 drawers.  I always avoid using cabinets with doors (cupboards) as they just don't provide usable, accessible storage.  Because Ikea doesn't have many bathroom vanity options, I took their Akurum kitchen cabinets and customized it to make a vanity.  Because the kitchen cabinets are 24"deep, we took about 2.5" off the back of the cabinet which still allowed for the drawer glides and drawer boxes to fit without any alternations to them.  I ordered (1) regular full depth, tall drawer (used on the bottom) and (1) 12" deep tall drawer for the middle, this allowed clearance at the back for the plumbing, the top drawer is a fixed drawer front only, no dawer box.  Finally we added a full gable on the end and voila - a beautiful vanity with TWO big, self-closing drawers.  It worked beautifully and was a super easy project.  I topped the vanity with Blizzard colour quartz by Caesarstone , an undermount sink by Kohler and a beautiful set of contemporary chrome cross style faucets.  The entire vanity assembly was about $1,000.  This is the only photo I had the captured the light fixture, it was a tubular chrome and glass style, $49 from Home Depot.  The pivot mirror was another Home Depot buy, I like to use these in family baths because the tilting feature allows you to aim it lower for the little ones.

After - Main Bathroom


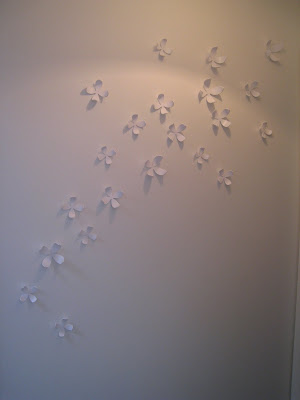
After - Outside the main bathroom, view of door to the back bedroom.  Floral wall art by Umbra.


After - Floral Wall Art by Umbra.  These little 3D magnetic flowers added some texture and interest to this small hallway area outside the main bathroom also right outside the door to the back bedroom.


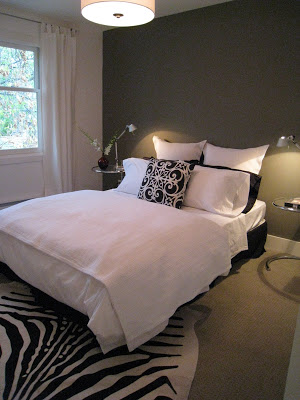
After - Back bedroom with dark grey accent wall, I eventually added three birch framed black and white photos on the wall above the bed, same as the ones hown below.  It was the final touch the bed wall needed...

Limited Edition Signed black & white framed photos in birch frames by Ikea.  As much I as often use ready made frames, normally I am dead set against buying mass produced artwork at stores like Ikea, but I have to say I couldn't resist these signed b&w photos when I saw them.  It was the perfect instant solution for this long blank wall in the back bedroom.  Mostly I really like the square shape and the custom look of the extra wide matts, I know I can switch in my own photos later.


After - Back bedroom ensuite.


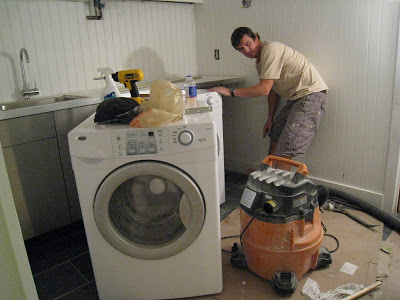
Before - Back bedroom after demolition.

The greatest change in this ensuite was that we enlarged it, allowing us to fit a good size walk-in shower.  After our successful concrete patching in the basement, we decided to make the shower pan floor ourselves.  After doing some research on google, we followed this detail for the construction of the shower pan floor.  The materials are inexpensive and it was fairly simple to do ourselves.


Cross Section Detail - shower pan floor construction.


Before - This is Six spreading out the first layer of mortar mix (mixed by moi!)  for the sub-slope.


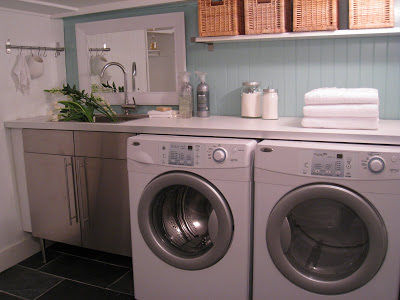
After - Ensuite in the back bedroom with cusomized Ikea vanity and new walk-in shower.

Because this was the ensuite in what could be the master ensuite, I opted for a luxurious walk-in style shower in lieu of a tub/shower combo. Since there was a tub in the main bathroom, I felt a shower was sufficient and often preferred for master ensuites. I designed the shower to have one large frameless piece of glass with no door, which is about half the cost of installing it with a door. In this case the one panel was large enough that without a door, it still provided enough of a guard to prevent the rest of the bathroom from getting wet when the shower was used. I wanted the shower to be luxurious so added a ceiling mounted rain shower head as well as a hand held which is really convenient for cleaning or for those times when you don't want to get your hair wet (ladies!).

Once again I decided to splurge on the floor and the countertop, both bianca cararra marble.  On the floor I used a 1" x 1" honed tumbled cararra and continued it thru the shower floor.  The main reason I used cararra in this washroom was because I knew I would need solid marble jambs for the shower and most building centres carry 6"w cararra marble jambs in stock.   This is a huge savings in time and money, (not having to have them custom made) so, by chosing bianca carara for the floor and counter I knew I could purchase standard instock jambs to match, for a complete custom look.  For the walls, again I went with a simple white subway tile, but this time in a 4" x 8".


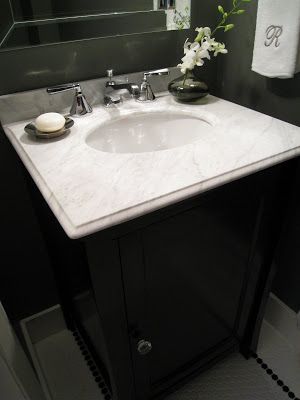
Bianca Carrara Marble counter top.

The full-width mirror was custom cut to size but was frameless for a clean modern look. We mounted it on 2" blocking so it appeared to float away from the wall - this is a beautiful detail that cost nothing. The light fixtures were a great find at Union Lighting , displayed as ceiling mounted fixtures in the showroom but I thought they would make perfect wall mounted fixtures for above the mirror, at only $54 ea., they were a steal, the square shape and polished chrome give them a high end look. The toilet and vanity used were identical to those used in the main bathroom, but here the carrara marble countertop was used instead of the caesarstone and I also switched the style of the hardware to a linear lip pull.

(Before I end this post I have to mention to please keep in mind this project was first and foremost a renovation project, not a furnishings and decor project, so even though there are furnishings and accessories in the photos, I literally had only spent 2 days moving furniture in and setting the house up before these photos were taken! yikes..)

For more posts on this project, check out Part 1 , Part 2 , and Part 3 of this Victorian Row House renovation.

Stay tuned for Part 5, the Main Floor Living Room, Entry and Dining Room......


All Photos:   Carol Reed


Victorian Row House: A Designer Reno on A DIY Budget - Part 3


Basement - Before & After

*Edit February 2015*
I've recently learned this former house of mine is currently for sale on MLS and also has been popping up on some other Toronto websites with links back to my blog posts here, citing that this is still my house and that i still live there.  Just to clarify - I no longer own or live in this house, I sold this house in December 2008.  I want to also mention that because of my blog posts here about my house renovation, that two years after selling it the new owners, (he was fresh out of law school) filed a claim against myself and the Home Inspector for mis-representing the property (after an earlier failed attempt at trying to get money from each of the Broker firms ).   After moving in to their very first home the young new lawyer and his  new wife were not happy with the lack of sound privacy the row house offerred and claimed the real estate listing failed to disclose what the sound levels were. (??).     To make  a two year long small claims court story short,,,,,in a settlement hearing a Judge basically said they didn't have a chance, not a chance of winning any type of settlement in court over this,  it wasn't a new build, it was a 100yr old+  row house and their expectations about what they were entitled to were completely unrealistic.  Caveat emptor.  It took two years of lawyers time to settle that.
*end of edit*

The basement of this old house was completed finished space when we purchased it, except for the crawl space area at the front of basement which only had a drywalled ceiling.  Despite the fact it was finished it was in nasty shape due to years of neglect, water penetration from a poorly situated down spout and an unusually large gapping hole in a window well.   The best part about the basement was the clear high celings in the main areas.  Below are the before and after plan views.


Basement After - bottom of stairs, new powder room door on right.


For some reason, I didn't have any before pictures of the main area of the basement, but it was drywalled and painted burnt orange and yellow like the upstairs (see previous posts for Part 1 and Part 2 ) and had wall to wall carpet that was moldy and urine stained among other things.   I made the landing area at the bottom of the stairs a little larger and planned for this area to serve as a coat and shoe zone since the front entry upstairs didn't have a closet.  I relocated a pair of existing french doors (originally from the kitchen) with leaded glass for the entry to the main room - this room could potentially serve many purposes, it could be a bedroom, a home office, a home gym, a play room or a media room.  The doors gave the space character and made the basement level feel larger by creating this 'view' thru glass doors to a room beyond.  With the addition of drapery panels or frosted film, the doors could also allow some sound and visual privacy from the upstairs and the laundry area.

The entire landing area and back into the laundry room was finished in beadboard panelling.  Even though the interior of the house was going to be mainly contemporary I wanted to mix in a bit of nostalgic victorian era charm.  So the all white walls were given the beadboard treatment, door hardware was oil rubbed bronze and I chose shoolhouse fixtures for the ceiling and an industrial lantern style for the laundry room walls.  Originally I had planned on carpeting the basement but later decided to tile it so that if there was any water penetration in the future, it would be visible and noticeable.  I went with a classic natural slate 12 x 24 tile in an offset brick pattern with plans for a large plush area carpet for the rec room.

Below are some before pictures of the basement bathroom and laundry room.  The bathroom wasn't functioning, the toilet and sink both drained onto the floor and the ceiling height was only 6'.  The laundry room also only had 6' high ceilings and was small and dark.  The design plan was to relocate the powder room to where the large closet area was located at the bottom of the stairs which had full 8' high ceilings and would in turn gain us a larger laundry room.

Before Powder Room, you can see the black water line on the vanity.


Before Laundry Room, awkwardly placed sink and no counter space.

After demo'ing these rooms we ended up taking down all the drywall on the walls in this area because it was in such bad shape it wasn't worth the time or effort to patch and repair it.  In order to relocate the toilet we had to dig up a small section of the concrete floor to run the new drain and the removal of the old quary tile left the concrete subfloor in pretty rough shape too.  We ended up with about 35 sf of new concrete floor to pour and patch after the new plumbing work was complete.   Thanks to a contractor friend of mine who suggested we could 'easily' do this ourselves,,,,,,,,I convinced my brother that we should give it a try (perhaps it was the beer?).  So with my friend's instructions and a list of materials my brother and I eagerly headed off to Home Depot to get our supplies.  Needless to say before we even finished trying to load 15 bags of Sakrete onto our cart at home depot........we began to have second thoughts.

If you ever tried to lift a bag of Sakrete, you'll understand why i suddenly began to curse my so called friend.  I instantly felt bad for getting my brother into this because while I'm sure 2 men could 'easily' handle this task,,,,,,,,one strong handyman and his petite designer sister,,,,,,um, not so easy.  I'm pretty strong for my size, but with all my strength I couldn't even budge one of these bags let alone lift one.  And its a good thing we had a truck with heavy duty suspension because any normal vehicle would bottom out with this load.  15 Bags of sakrete mix, is just over half a ton.

We then, ok he, managed to get the bags of concrete into the truck, out of the truck, in the house and down to the basement where we figured out a game plan.  We built a mixing station out of plywood with 2 x 4's sides and just mixed right there.  I took on the task of doing all the mixing, manually, eventually determining that a 'cookie dough' consistency worked perfectly, and Six did the pouring and trowling, levelling.  Not even half way thru I thought I was going to die, my arms felt like they were going to fall off - but I couldn't stop, once you start there's no turning back, we had to keep going.  It didn't actually take too long, maybe 2 hours and we were done, but it felt like 10hrs!

 
Here we are, after completing the floor, Six was checking the height of the drain to allow for the thickness of the new floor tile.

Leaving my mark in a freshly poured concrete floor.....it took 3 or 4 weeks for my arms to recover after this little DIY project.  Never again....


During appliance installation.  New tiled floor and beadboard walls.

I knew I wanted a front loading washer and dryer combo so that I could put them under a long length of countertop.  We planned the room so it would be 8' wide to accommodate an 8' length of ready made countertop.  This is the only counter in the house that was laminate but it didn't make sense to me to go high end here,  I chose to put as much of the laundry room budget into the appliances as I could instead, these front loaders by Amana were the best value I came across for glass front doors on both the washer and dryer.

The decision to clad all the walls in beadboard meant that we didn't have to hire a drywaller to finish the room so this saved us time and money, but ideally I just loved the look.  I first painted it all white then opted to paint the back wall a turquois coloure by Ralph Lauren.  A bold colour choice for me that's for sure, and while I liked it, I know if i was living there now it would be back to white or perhaps a dark charoal colour. : )   Because there was no window in this room, I added a mirror over the sink ($35 from Homesense) which really created the effect of a window and helped relfect more light.  The counter top had a nice thick aluminum edge which worked well with the stainless steel cabinet doors, shelf brackets and trim on the appliances.  The cabinetry, counter, sink, faucet, shelf and baskets were all from Ikea and totalled about $600.

After Laundry Room - this is the same corner of room as shown in the concrete floor photos above .  Because front loading style appliances are higher than the conventional style, your counter will need to be higher than the typical 36"h counter, make sure you use the 6"h feet on your cabinetry to accommodate the extra high appliances.


After Powder Room

The new powder room had nice high ceiling space and comfortably accommodated a vanity and elongated Toto toilet.  I chose a vanity that came with a carrara marble countertop and sink included which was less expensive and faster than buying and installing these elements separately.  I deliberately chose a vanity over a pedestal sink so that there was some storage space. One of my favorite faucet sets is this one by Rubinet which is the best quality wide spread set I've come across in the less than $250 price range.  It has a very classic look to it in its polished chrome with facetted detail.

I chose a tray mirror to add a little sparkle, and because I planned to install wall sonce lighting, the proportions of this mirror were perfect at 22"w x 30"h - it left just enough room for the light fixtures.  But at $220 this mirror was definitely a splurge.

I added a crystal knob to the dark brown freestanding vanity.  You can see a bit of the floor in this photo,  it was a white hexigon with a black border, a touch of classic victorian.


In powder rooms I like to use dark colours or dramatic wallpaper, here I opted for a deep charcoal grey paint.   Its a tiny room and this deep colour created some graphic contrast and made the dark wood and carrara look really elegant, a nice space for guests to use!

It was difficult to photograph this powder room and unfortunately I was using my old point and shoot camera so the photos aren't the greatest quality.  The wall sconces make the room feel very elegant and give off a warm soft, complimentary light.  They were a steal at only $42 each at Union Lighting .  Its always tricky in a renovation to pre-plan for wall sconces when you havn't selected a fixture yet.  When my electricians were on site months earlier, I had them just leave the wire for the lights coiled up in the location I specified.  My drywaller boarded up the room and later when I purchased the sconces and I knew the exact size of my mirror, and where the lights would go,,,we marked it out and used a hole saw to drill exactly where I wanted the sconces.  Once the holes were drilled the wires were easily reachable so we could hook up an old work style j-box to mount the fixtures.


Stayed tuned for Part 4 of this Victorian Row House Renovation where I'll post before and after photos of the 2nd floor bedrooms and bathrooms.


All Photos:  Carol Reed